Stage-4, Complete K66 Oil-Change Guide GT/TS, Servicing the Tuff Torq K66

GT48DXLS

Tractorologist
Senior Member
Member
Stage-4

Tuff Torq K66 Service

This oil change is at a total of 190 hrs on the clock and 127 hrs since the last K66 oil change on mine.

Before starting, I recommend,

1) An impact wrench, air is fine, but if you have an air compressor you probably have one already, just remember to not use too much force, the top fan pulley nut is 45 foot lbs.

A cordless impact at 1/2” will be fine, 3/8” I’m not sure, so this info would be nice to know.


An electric, corded impact that can be bought for approximately $25 at 100’ lbs rating would work fine also.

The point of the impact wrench is to safely remove and install the top fan pulley nut while minimizing the risk of breaking the fragile fan blades.

Here are some examples, there's one for every budget,

Cheapest,

cheapest impact.png

For the cordless crowd,

cordless impacts example.png

For those that have air compressor's, (I have this one, works great-6 yrs now)

air impact.png

2) Have the Tuff Torq PDF’s on the service with you, I have supplied them, they are on the Tuff Torq Parts page, and I will always recommend what they say over anything I say if there is conflict. I don’t think there is any, but just in case, please, always refer to Tuff Torq over an individual such as myself, and please, don’t hesitate to talk with Tuff Torq to confirm or just get extra guidance.

I have found Tuff Torq easy to talk with in my experience, and for those skeptical, GOOD, I am too. If you doubt me and think I’m the kind of person that just gives away a job well done without any work, just read some of my earlier threads or talk with some of the senior members.

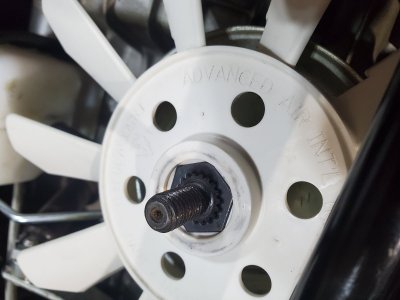
By now you should be starting here,

3.JPG

1) Make sure the top is clean, observe the reservoir bottle fluid level, is there any damage to the fan blades, is the belt frayed, etc.

This was mine,

1.JPG

The edges of my belt show wear, I’m replacing it,

The fluid level was fine,

2.JPG

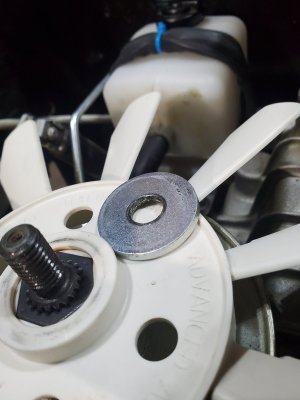
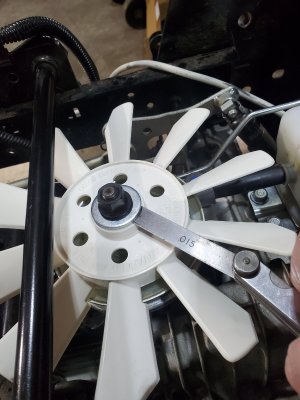
2) Remove fan, belt pulley and 15mm top nut with your impact wrench and socket. (at the low torq settings special impact sockets are not needed), it has standard threads (lefty loosey, righty tighty) While holding the belt tight on the pulley with one hand, remove the nut. The belt held choked tight against the pulley uses the natural grip of the belt to hold the pulley from moving. The impact wrench will loosen the nut by very quick hammer blows and resist loosening by leverage.

4.JPG

Choked belt,

5.JPG

This was the built up dirt between the fan and pulley,

7.JPG

With the above being said, you can use a socket wrench. I would use a helper if possible to hold the belt with 2 hands and have sufficient strength to counter your muscle input, harder but will work fine, fan blades, fan blades, can’t say it enough. If you break them, don’t panic, they are easy to purchase not terribly priced but you will wait with your project.

If you have PB Blaster or WD-40, with care not to spray your belt (remember it’s a listed solvent too) with a straw you could put a dab on the threads to get absorbed first.

3) The belt can be easily removed from the main transaxle pulley, from the side my hand is on. If you are replacing the belt, just cut it,

8.JPG

Stage-4, Continued on the next reply...


Stage-4, Continued...

4) Lift the fan off, from the center not blades. Place the fan in a safe place.

6.JPG

5) Lift the drive belt pulley off, (or up, held with sm block of wood-you need some clearance for the hydro fill bolt access)

9.JPG

6) The reservoir bottle is attached to the “Hydro Fill Port”. The fill port has a fitting pressed in by hand only, locked in place by a 12mm bolt. Remove this bolt with a 12mm end wrench or socket,

10.JPG

11.JPG

12.JPG

Once the bolt is removed, lift the reservoir bottle, tube, and fitting all at the same time as one unit and set on a clean surface, this will prevent an oily mess to clean up for the bottle separating from the tube. A small amount of oil may come out if higher than the tube. Don’t worry about measuring the oil in the bottle, we will measure what comes out of the transaxle.

14.JPG

15.JPG

16.JPG

7) Have your oil ready, This is what I use, there are other great products and of course, you can't go wrong with Tuff Torq brand. Tuff Torq says it must be JASO MA-2. The use of 5-50 or 10-50 is allowed for hot weather and heavy use, other factors to consider for your specific needs.

17.JPG

8) Get a measure bucket, I like these, from the box store paint isle, cheap, and disposable.

18.JPG

Stage-4, Continued on the next reply...

 
Stage-4, Continued...

9) Tuff Torq says 2.5 liters or 2.6 liters total, I’ve seen both on their own literature, don’t panic, we are going to measure what comes out, (what comes out should go back in) and just reference as a redundancy the amount against the official literature, with the recognition that the official number is the one used when assembled. If this process gets messed up, don't panic, it will resolve itself in the way I'll be showing to fill the transaxle.

There are 2 chambers according to Tuff Torq on the K62/K66 and these chambers have there own amounts, they don’t mix.

Hopefully I have your mindset in the K66 as 2 separate chambers now.

10) We will change the hydro chamber first.

Your fill side is open, and you don’t want anything to fall in. Contamination here is a new Transaxle in short order, Panic. Just a bit of humor ’ish, If something falls in to contaminate the chamber, as long as nothing is turned after the oil is drained, this too can be fixed without huge expenditure but you will have another project. I or someone else on this sight I’m sure will help you through the process of splitting the two transaxle cases apart in order to clean all the parts, the contamination shouldn’t cause harm unless it’s pulled inside the pump and motor.

With your oil pan under the transaxle and your measure bucket under the hydro drain, we will remove the 14mm bolt and let it drain. This picture taken from the right side.

18.JPG

Note- I know it looks like a maze of bolts underneath. This is where the sharpie is handy, or paint pen. If you find yourself confused when looking at the picture and the bottom of your transaxle, get your 14mm socket or end wrench and find all the 14mm bolts. There are only 2 14mm bolts. When you find a 14mm bolt put a sharpie mark on it. All the other bolts are smaller, 12mm or 13mm. You should have 2 clearly marked 14mm bolts now and they will be on each half of the transaxle if you split it down the center from front to rear with your mind or a sharpie. The 14mm bolt on the right side is the hydro chamber. Done!

Keep in mind, my goal is to help someone with very little to no skill do this, just take your time.

The 14mm bolt has a crush washer, the safest advice is to always replace a crush washer, they are a one time use only design.

19.JPG

With that said, I used the same one over again, knowing if it leaks, guess what I’m doing? Yep! From scratch, all over again. There is your risk. If you have a Dealer like my new one, he will most likely have one in stock, and they are cheap.

Here is mine draining,

20.JPG

After it drains, now let it drip. I did for 20 minutes. do as I do and expect the same results sure, logical, but at least 5 minutes of dripping would be good, its the very bottom and if any metal particles exist, that's a place they will be.

My chamber gave me just over a liter or 37-38 oz’s.

23.JPG

11) Record what came out and note how dirty the oil is, or clean. Does it have a burnt smell? Take a flash light to it and look for small sparkles, this is metal or a possible sign of excessive wear. Metal flakes should sparkle under light in a very noticeable way.

Put the 14mm drain bolt back in but only hand tight, then use your wrench and snug it. (it’s aluminum, easy to strip threads, easy to overpower) Place a clean micro fiber type towel (no lint) lightly over the hydro fill port.

12) Unscrew the gear side fill cap, make a mental note of the placement of oil inside the short fill tube and right it down. I measures mine, at approximately 1” down from the bottom of the cap when fully inserted, as an example of what your looking for. This was good according to Tuff Torq, the gear side doesn’t have an overflow reservoir for when the oil expands as it heats. This small amount of space at the top is there to allow for this expansion.

24.JPG

25.JPG

26.JPG

27.JPG

From underneath, with your measure bucket empty and placed under the left 14mm bolt or gear side, remove the bolt, let drain, let drip. On mine the gear side was the dirty side, no filter on this side, makes sense.

28.JPG

29.JPG

Stage-4, Continued on the next reply...

 
Stage-4, Continued...

While its draining, separate the reservoir bottle from the fill tube over an oil catch, drain the oil. Remove the top vent cap, it has 2 pieces, the rubber cover and the plug. The plug (my pen is pointing to the plug) is hard to remove. It will look like this,

13.JPG

31.JPG

With a little attention, and a couple oz of fresh oil swished around inside the reservoir bottle, you ensure its clean. Dump the bottle, wipe it clean, (I try to clean as I go frequently when dealing with transmissions) set aside.

33.JPG

13) Measure what came out of the gear chamber, record it. Mine was approximately just over a liter or approximately 37-38oz. Examine the oil for cleanliness, is it burnt, and are there metal flakes. Replace the 14mm bolt with crush washer, hand tighten then with your wrench, snug it.

35.JPG

36.JPG

At roughly 33 oz per liter and 16 oz for half a liter 2.5 l is roughly 82 oz total. How did you do? Remember the reservoir bottle will get some oil too. But are you roughly on track as compared to what I have recorded? Only ball parking as a performance marker, if you only got 25 oz from the gear chamber, that would be off a bit much.

14) With a funnel, pour the first quart of oil into the gear chamber, but slowly. Check the level after the first 20 oz. And check as needed each oz after until the level is an inch below the top. If you pulled out 34 oz and its full after 20 oz don’t panic, we will work the air out later.

15) with your funnel, open a fresh quart (pour from one quart dedicated to its side, this is an easy way to measure 32oz worth for each side), pour slowly into the hydro chamber and just like the gear chamber, you may be working to fill every oz after 20 oz ish. On the hydro side fill to approximately 1/2” from the top or try and get all 32 oz in it if you can.

You can place the pulley on the shaft and turn it by hand slowly in a clockwise direction, several turns, if the level starts to drop and you can pour more of the 32 oz in, great. Check on the gear side too, see if the level went down any, and replenish to an inch below the top until the 32 oz is all in. (if there is air and you turn fast you could end up being counter productive and push an unmeasured amount of oil out with a mess).

Be patient, it’s a process, and it’s worth the caution in my view.

By now all 32oz of each quart should be in the 2 chambers. In my case, I know that no matter what I see, the hydro chamber still needs approximately 6 oz and the gear chamber 5 oz, according to what I measured coming out.

With a small measure cup in oz, continue to fill the gear side with what is left that it needs or as close as possible till an inch below filler, place the cap on.

37.JPG

43.JPG

46.JPG

On the hydro side, fill almost to the brim with what is left to put in, press fit the reservoir fill tube into the reservoir bottle and in one piece place the unit back on with the fitting back into the hydro chamber fill opening, reinstall the 12mm bolt, snug it, don’t wrench it, it’s aluminum, if you only have a total of 28oz at this point that’s ok, the main thing is knowing how many oz are needed to go in and that the level was at the top.

38.JPG

40.JPG

Stage-4, Continued on the next reply...

 
Stage-4, Continued...

Now fill the reservoir bottle half way or 2” from the top, don’t put the plug on yet.

42.JPG

49.JPG

16) This is the time to spin the shaft, by hand or with a drill on low rpm setting. Spin it for a time, the reservoir should be filling the hydro chamber, don’t let it fall below the filler tube (not critical, just helpful). If you have more to add, stop spinning and do it now, it’s probably the last anyway.

The gear side, remove the cap, check level, is there another oz or so that needs to go in and if you do, will it overflow? Will it fill past the spec level? If yes to the first, follow the procedure of spinning again, if your math was right pour the rest in regardless of level (but not overflowing), and spin with cap off, it should settle to the approximate start level and the math will be right, 34 oz is 34 oz, 35 oz is 35 oz, etc, whatever came out must go in.

17) With the math right in the gear chamber, tighten cap, done.

I took the time to measure the lines on the reservoir bottle, they are as follows from the bottom up,

50.JPG

line-1 .5 oz
line-2 1.0 oz
line-3 2.0 oz
line-4 3.0 oz
line-5 4.0 oz
line-6 5.0 oz
line-7 5.5 oz
line-8 6.5 oz

18) With the math right in the hydro chamber, fluid level in the reservoir bottle here (I put 6 oz in-38oz in hydro + 6 oz in reservoir + 37 oz in gear chamber = 81 oz and almost 2.5L), or at the original start point, put the plug back in and replace the rubber cover, make sure the fill tube is not leaking, and that the reservoir bottle is secured, the 12mm bolt was snugged, your done.

58.JPG

Tip- The zip tie ensures that the bottle is secure, I do this because the bottle is a source of leakage and is very difficult to have eyes on it while operating tractor.

Also, try and avoid oily fingers on the pulley and belt.

19) With the chambers full and buttoned up, put your pulley on with top nut hand tightened.

58.JPG

20) Push the freewheel rod back in to engage the transaxle.

4.JPG

21) Use your drill to just spin the pulley, fast is fine, and while spinning fast, start pressing the control pedal forward, and then reverse, forward and revers, you get it. The axles should start quickly responding, your done bleeding a transaxle, that actually doesn't need this kind of prebleeding attention.

This is a good way to verify that all was done right. Imagine, you re-assemble the tractor get on and it won’t move, and now you have another full project.

22) Replace drive belt, walk it on in a clockwise direction, turning the shaft by hand. Make sure all moving parts are free to move, clean up. And all should look like this,

56.JPG

23) Remove the top nut, install the fan, install the 15mm top nut.

The torque spec is 45 foot lbs. That's considerably less than your wheel bolts, keep this in mind, its not a lot, and use your belt to hold the pulley still and a light impact. If you wrench on it with an impact (I’m speaking to those of you like me with air impacts that can snap bolts twist metal) you could cause damage to seals, case, shaft, etc. For most light impacts its just a second or two burst. If you have a helper that can hold the pulley tight without breaking the fan blades while using a torque wrench, this would be safest for the transaxle. A clicker type torque wrench in foot lbs would be fine, and are affordable. I do like dial torque wrench’s too, either is good.

It should look like this,

59.JPG

Pull the transaxle freewheel rod back out, (disengaged)

5.JPG

Time to assemble with confidence, The hardest parts are done, and this will go surprisingly fast.

Stage-5, Complete K66 Oil-Change Guide GT/TS, re-install fuel tank, and main body.
 
Thanks a lot for this complete guide, really helped me a lot!
But I have another question about oil refill. I have a K66S. With an external oil reservoir and a external oil filter (both for the hydro part). Two drain plugs. The hydro oil might be refilled by using the reservoir, but no way it is possible to fill te transmission oil because the opening cannot be reached at. it is stuck right underneath the chassis of the mower. I could not find what the S mark means. Anyone ideas how to change the oil?
 
My Husqvarna tractor has 190hrs on it. Relying on the manual, I have not changed the oil yet. After doing a bit of research, I've come to the conclusion that this may not be a good plan. Dropping the transaxle to do an oil change seems a bit extreme however. There must be an easier way. I'm thinking of installing a pair of these plugs in the drain holes. ValvoMax Oil Drain System
These have a valve in the plug. After draining the oil, I could pump in the same amount of oil that I drained out using a hand pump. Once filled, the valve closes when the fitting is removed. Yes, I'd have to double-check the overflow tank to see that it sits at the right level. My concern is that I may damage something by back-filling the case. I'm hoping that someone who has been inside this transaxle can comment.
 
This looks like a good write up. I will be changing out my fluid no doubt. That being said, they don’t make it easy. I was thinking of changing it with the best fluid I can get my hands on. Then do maybe 30-50hrs at 1 year change intervals.

I’m hoping this K66 I just bought will last for quite a while if I take care of it, and not abuse it.

Actually the ValvoMax idea is intriguing... I would think that damaging anything would be doubtful since the top plug would be out. This would leave a way for pressure to equalize.
 
Just did an Oil change on a Husq 2019 TS354D K66AG Trans per above tips and have a suggestion. To save time and work, cut out the narrow piece of the Fender body that ties the forward edge together. The Steering shaft linkages, wiring connectors etc, can remain intact.
 
I noticed the fan is loose on the trans pulley shaft. I did not think that was correct. When talking to Tuff Torq they said it should not be loose as well. I might be able to get something on the nut to tighten it. Then I think it might be possible to change the fluid out of both holes without taking the body/fuel tank off. But not sure yet.

I am tearing things down, but will see if I can get to the gear case cap off, as well as the reservour cap. Then I will know if I have a chance without tearing the entire body down. I just bought an extra gear lube pump. I'm looking to use to see if I can pump the fluid into the trans. Crossing my fingers saying a prayer........
 
I was thinking of how I can do a fluid change out without removing the body/console/seat/fuel tank. It would have been very difficult. Also the hydro fan was not seated to the hydro shaft. Even if I could change the fluid out without removing body etc, I would not be able to get fan nut seated/torque to get the fan to seat so it was not loose.

So I had to take everything apart like GT48DXLS did. I feel good about doing it because I can now access everything.


I pulled some slack on the belt. I then got a small strap wrench between the belt and fan. I was able to break the nut loose on the fan. I don't know if anything in the hydro could be damaged by an impact driver. I was not going to chance it. So Hopefully I can get it torqued back on.


I found that the pump I bought had the same threads as the drain bolts. My intention was to do a bottom fill on the hydro, and gear chamber. So I did not have to deal with the burping BS.

I thought it was going swimmingly...... I was filling the gear chamber from the drain port. I was getting what was close to the 3/4 qt amount. I did not see the fluid coming up towards the top. Then I started wondering if it was draining out elsewhere while I was filling. I must have looked 4 or 5 times to make sure nothing was leaking. I kept pumping pretty much the whole qtr. in now. Still was not coming up very full.

Then I looked under again, oh shoot....... 4-5 oz. leaking out of the hydro chamber drain. I then capped off the hydro plug, then added more fluid to gear chamber pumping from the bottom. I then capped the gear chamber drain. I then pumped the hydro chamber up to where the overflow bottle elbow O-ring seats. I swished out over flow bottle 2x then let bottle drain overnight.

Well I don't know the meaning of "Oil will not flow between compartments". This is stated in 2 of the Tuff torq bulletins. Anywho...... it is filled, and purged. I will be installing the belt/pulley/fan next. I will then be putting the fuel tank and everything else together. I’m really glad I took things apart this way. I got a bird’s eye view of everything. I will be dropping the hydro from the bottom the next oil change. I will be making a little jig to hold/support it in a manner that will allow me to drain fluids. I am going to drain fluid, then pump from the bottom with my 1 qt bottle pump.

I will again use my heavy duty corded drill to purge/top off fluid levels while running unit. I think I'm not going to remove the reservoir at all next time, just suck out fluid with vacuum pump. Then maybe pour a few oz into reservoir swish around and vacuum pull out that fluid again. I believe that when I'm pumping the hydro fluid from below that it should start filling the reservoir.

I'm hoping the bottom fill may be the smartest thing I will have done in this whole fluid change ordeal.............. We will see. I put in the Amsoil Hydro trans fluid. It is a 5w-30 fluid. I'm hoping it holds up better than the Tuff Torq fluid that was in it. For those freaking out I'm not using a 5w-50 synthetic oil. I see that the one fluid Tuff Torq carries, covers three different fluid requirements.
My fluid has 63 hrs on it. I did not really see any metal particles. Fluid was not black, or really dark. More medium amber colored. It would be interesting to know the original color of the OE fluid? Tuff Torq says change at 50 hrs then 250 hours. I'm not sure how many years/hours I'm going to go. I'm going to mull that one over...........

I have the K66AG unit
When I look at the Tuff Torq fluid chart, they show:
Tuff Tech Oil 187Q0899000 as the required replacement fluid, or 5w-50 synthetic oil. I told Tuff Torque I wanted to not use their fluid. They told me to use a 5w-50 oil.

Tuff Tech Oil 187Q0899000 shows it works for these 3 fluids:

Hy-Gard High Viscosity
10w-30 Oil*
5w-50 synthetic oil
It shows a couple of others with note to see the manual.
So It appears the 187Q0899000 fluid is universal to a degree

I will do an update next time I drop the hydro from the bottom to service it. I assume it will be successful....... But nothing ever seems like a slam dunk nowadays. ;)
 
Last edited:
Well I'm stuck on not being able to assemble the pulley/fan/washer/nut. When I first worked on it, I noticed the fan was loose. There is an E clip that the pulley, and fan sit on the splined hydro shaft. Then a flat washer and nut are supposed to seat it. Problem is there is about 0.015 inch of clearance that allows the fan and pulley to move up and down. This is with the nut torqued down.

I have been running it for 63 hours like this. I'm trying to get back in contact with Tuff torque to check into it. There is a shoulder on the shaft above the fan. The washer seats at its ID. So there is no compression of the pulley and fan. I'm sure the E clip can't take the 40 ft lbs of torque. But the fan/pulley needs to be slightly compressed.

The guy sent me an email saying it should not be loose. He told me makes sure the pulley/fan are seating on the e clip. That is obviously not the issue. I have a tolerance issue........ So I'll be trying to talk to him on the phone. I sent him a couple of pics showing 0.015 feeler gauge under the washer to show the gap. This allows the fan to move up and down about 1/10 of an inch at the outer part of the fan. Not ideal.......
 
Back
Top