Chipper

Camdigger

Tractorologist
Member
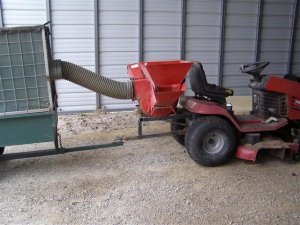
I have been doing some yard cleanup. I am at the stage that I have a lot of branches to dispose of. The county I live in has restricted burning, and we could use the chips for mulch.

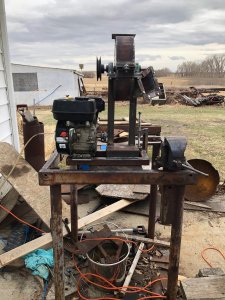
I looked for a rental. Turns out there are no reasonable rentals local to me. I don't have enough spare cash to buy even a homeowner chipper at the moment. A few afternoons surfing YouTube and a careful look at my material inventory convinced me that with a couple minor purchases, I could build a low hp chipper from what was in stock.

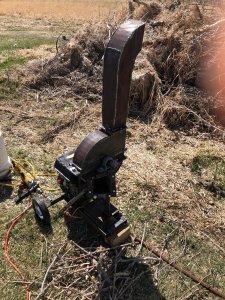
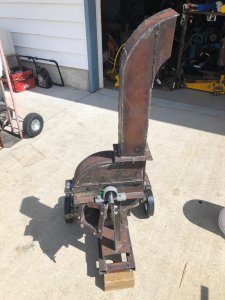
Seems to turn branches into chips effectively during testing. It is definitely worth finishing some details like I feed chute and a tow hitch/handle.
 

Attachments

  • IMG_0504.jpg
    IMG_0504.jpg
    489.7 KB · Views: 34
  • IMG_0505.jpg
    IMG_0505.jpg
    418.6 KB · Views: 35
  • IMG_0503.jpg
    IMG_0503.jpg
    216.8 KB · Views: 35
  • IMG_0500.jpg
    IMG_0500.jpg
    257.3 KB · Views: 36
Last edited:
I have a short video of the test run, but the server won't upload due to file size.
What did you use for blades or did you go the hammer mill route.?
AND ...the chute on top...is that the discharge or feed...???
Edit...Looking a little closer I think I see whats going on... I think:)
 
The chipper feeds from the side and discharges out the top.

The knives are 3" chipper knives off Amazon that run against a shear bar made from a piece of leaf spring. There is about 2 mm clearance between the knives and shear bar.

Plans are to add a feed chute to aid in feeding as time allows. Not sure when the rest wil be done as I am doing some fertilizer deliveries for the spring season.
 
I would be curious to see more picture of the internals and also where you got your inspiration from, if you still have links. Been thinking for years to build a leaf vacuum with a chipper to use on the rear PTO of my MF 1655 so the more ideas the best :)
 
It looks like he used the MTD design like my old chipper I use for a chipper/shredder/leaf vac on a Toro 15/44 lawn tractor. It uses large hoses for the bagger chute and to blow material into a small screen enclosed trailer that pulls behind it. I'll take a pic of it when it gets light, little dark out right now.
Here's the pic. It has the shredder chute on it now 'cause I'm going to shred a bunch of straw for garden mulch. When using as a vac the shredder chute is removed and replaced with a bagger chute that has a hose attached that attaches to the intake.
 

Attachments

  • leaf vac 001 (Small).JPG
    leaf vac 001 (Small).JPG
    72.3 KB · Views: 11
Last edited:
Macworld, if you can find one like like mine with a blown/missing engine you could set up a jackshaft to mount the rotor on and with proper sized pulleys get it up to the 3600 RPM the rotor needs. IIRC the shaft is 3/4" w/ a keyway and a 3/8" hole drilled and tapped in the end for the mounting bolt. You'll also need a 1/4" or 3/8" plate mounted on the jackshaft assembly to mount the rotor housing on. Though mounted 90* off from the way mine is you'd have to mount it off center to make the hoses work and would still need a 90* ell on the exhaust to blow material into the trailer which might present problems with slightly damp material. Anyway it's food for thought.
 
I would be curious to see more picture of the internals and also where you got your inspiration from, if you still have links. Been thinking for years to build a leaf vacuum with a chipper to use on the rear PTO of my MF 1655 so the more ideas the best :)

The internals are pretty simple. Rotor welded to a machined shaft. Here is the major inspiration to attempt this in my own shop...

I looked at several commercial chippers and video reviews before taking this on. DR, Echo Bearcat, and numerous others. I looked at and rejected the chippers/clunkers that feed in on the rotor's edge, choosing instead to go with the type that feeds in on the rotor face. I did not want or see the need for a shredder, so did not bother with the hammer mill section typically put opposite the knives on the rotor. I helped a neighbor run some sticks and branches through an old mostly original silage chopper and was impressed with the product, so knew I could live without the hammermill section. That vastly simplified the build, and avoided the need for a screen for the mill section.IMG_0463.jpg

I am enough of a basher that I can modify the basic idea to fit knives readily available from Amazon. After I had the knives in hand, I sketched up the rotor and housing before cutting any metal. I have been collecting salvage material for years, so had the rough stock on hand, including the new in box 1" pillow block bearings. Here is the rotor. The knives bolt to the machined recesses and run against a shear bar on one side of the infeed opening with about 3/32" clearance.
 
Back
Top