My GT has been getting more and more movement in the steering wheel toward the top, when suddenly felt like there was no upper support.
I have 383.1 hrs on my 2017 Husqvarna GT48DXLS (many models of Husqvarna, Crafstman, and possibly Dixon, Jonsered, Poulan Pro, and store brands, 2006 +) . The culprit was a very common plastic steering bushing that failed. Husqvarna #532195228. This is the part,
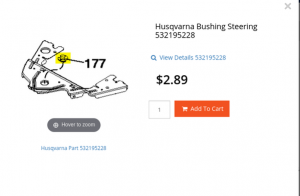
Plus $10.00 in shipping or $14.00 from Amazon with free shipping. It's cheap, I ordered, and waited a week. The new, and old,
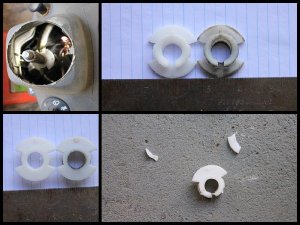
Top Left, Placement of bushing.
Top Right, This bushing has two one way snap on tines- on the old they are worn, bushing won't stay popped in, it's worn out.
Bottom Left, a little wear on the inside diameter, but enough to cause the steering wheel significant movement at the top. Notice the arrow at the top? This is to help line things up, facing forward on install.
Bottom right, This was so easy I thought, and that new bushing is broke.
At the thought of waiting another week, and kicking myself for not ordering two or three just in case, I had an idea.
Since this plastic is a common wear item and the steering wheel has never been very well supported by this plastic, but the steel bushing bolted to the steering support plate at the bottom has been solid, what if?
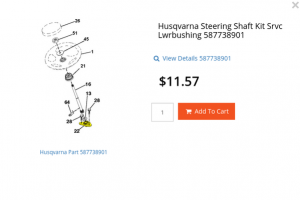
An extra $9??? I bought it and another plastic bushing just in case the idea didn't work, the old way did last almost 400 hrs of hard use.
After another week, they arrived,
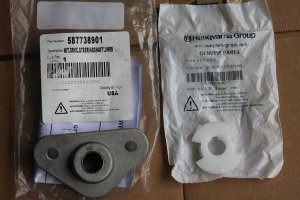
Now it's time to go to work.
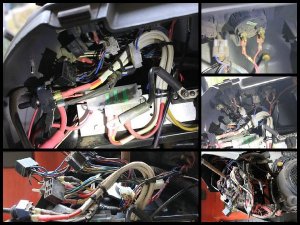
Pull the battery and case, all wire connectors, start solenoid, and the fuse box for Johnny Bucket Jr/ rear Power Sleeve, wire harness, and top plastic dash. The choke and throttle cable were not separated, I just set the dash off to the side, out of the way.
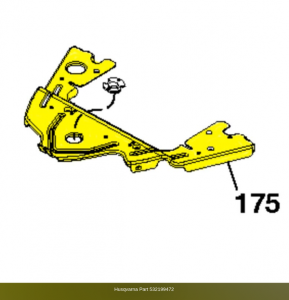
Last was the Husqvarna Crossmember, #532199472, it's what the plastic dash bolts to with 5 torx screws (T25).
If you followed my build a couple years back, found here,
That HF 12 speed drill press I bought for a hundred or so dollars came in handy again.
I needed to drill 2 holes in the crossmember, easy enough. The crossmember has a reinforced hole punched out for the steering shaft. The reinforcing part is the creased edge of the metal.
In order to make this as minimal as possible with the ability to go back to original design if I wanted too later, I decided to create a spacer of 1/2" PVC found common at the box stores, 3" wide. Cheap material, strong enough, and very easy to work with, with common tools. The bearing is a bit too big to fit inside the steering shaft hole so raising the bearing a 1/2" above this hole gave all the clearance and adjustability I needed for proper alignment.
A brief of the process,
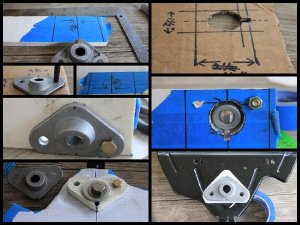
finished part, ready for install,
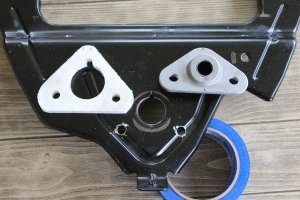
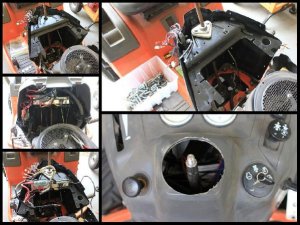
The install process was fairly easy, (before pictures always helps here, and the careful measuring payed off with a bolt on perfect fit,
The steering wheel is the final piece, and of course re-checking my work, making sure the wires are routed without interference and tight, then start, and make sure all electrics do work like they are supposed too.
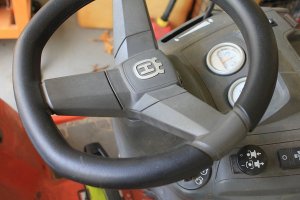
I think this is a good weekend project for the average person to do with average tools very minimal costs and the steel bushing is already on your tractor, working, designed for your tractor, with very solid results. A much stronger wheel, if you don't like it, you can always go back to the original design, but I don't think you will.
Cheers,
GT
I have 383.1 hrs on my 2017 Husqvarna GT48DXLS (many models of Husqvarna, Crafstman, and possibly Dixon, Jonsered, Poulan Pro, and store brands, 2006 +) . The culprit was a very common plastic steering bushing that failed. Husqvarna #532195228. This is the part,

Plus $10.00 in shipping or $14.00 from Amazon with free shipping. It's cheap, I ordered, and waited a week. The new, and old,

Top Left, Placement of bushing.
Top Right, This bushing has two one way snap on tines- on the old they are worn, bushing won't stay popped in, it's worn out.
Bottom Left, a little wear on the inside diameter, but enough to cause the steering wheel significant movement at the top. Notice the arrow at the top? This is to help line things up, facing forward on install.
Bottom right, This was so easy I thought, and that new bushing is broke.
At the thought of waiting another week, and kicking myself for not ordering two or three just in case, I had an idea.
Since this plastic is a common wear item and the steering wheel has never been very well supported by this plastic, but the steel bushing bolted to the steering support plate at the bottom has been solid, what if?

An extra $9??? I bought it and another plastic bushing just in case the idea didn't work, the old way did last almost 400 hrs of hard use.
After another week, they arrived,

Now it's time to go to work.
Pull the battery and case, all wire connectors, start solenoid, and the fuse box for Johnny Bucket Jr/ rear Power Sleeve, wire harness, and top plastic dash. The choke and throttle cable were not separated, I just set the dash off to the side, out of the way.

Last was the Husqvarna Crossmember, #532199472, it's what the plastic dash bolts to with 5 torx screws (T25).

If you followed my build a couple years back, found here,
The Build to "Beware of Husqvarna Garden Tractors!"
Turning a GT48DXLS into an actual Light Duty Garden Tractor. I want to show the process as it unfolds as best I can, mistakes and all, to hopefully inspire someone in my position (with a buckled frame) that finds himself on the fence, questioning, if you can do this, or to just pay the $500 to...
tractorfanatics.com
That HF 12 speed drill press I bought for a hundred or so dollars came in handy again.
I needed to drill 2 holes in the crossmember, easy enough. The crossmember has a reinforced hole punched out for the steering shaft. The reinforcing part is the creased edge of the metal.
In order to make this as minimal as possible with the ability to go back to original design if I wanted too later, I decided to create a spacer of 1/2" PVC found common at the box stores, 3" wide. Cheap material, strong enough, and very easy to work with, with common tools. The bearing is a bit too big to fit inside the steering shaft hole so raising the bearing a 1/2" above this hole gave all the clearance and adjustability I needed for proper alignment.
A brief of the process,

finished part, ready for install,

The install process was fairly easy, (before pictures always helps here, and the careful measuring payed off with a bolt on perfect fit,

The steering wheel is the final piece, and of course re-checking my work, making sure the wires are routed without interference and tight, then start, and make sure all electrics do work like they are supposed too.

I think this is a good weekend project for the average person to do with average tools very minimal costs and the steel bushing is already on your tractor, working, designed for your tractor, with very solid results. A much stronger wheel, if you don't like it, you can always go back to the original design, but I don't think you will.
Cheers,
GT
