O holy crap I I think I burnt my eyebrows off/wiring on roper rt16

Greasy6020

Tractorologist
Senior Member
Member
Kinda like Jeff Dunham’s terrorist puppet achmed... except not “o holy crap I think I blew my foot off”

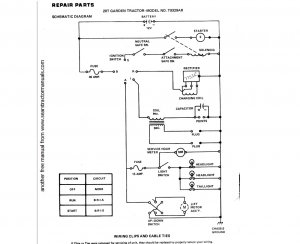
Anyhow! Roper tractor nearly burnt up me earlier. Hot wire to key grounded out on frame and burnt off, melted coating and burnt a bunch of other wires under the dashboard. How big of a project am I in for?

If anyone has any advice about electrical on Sears machines I’m interested in hearing it. Kinda sucks having roper out of commission, it’s my “go to” given its weight and gearing

I’ll add pics when I get home
 
You think? o_O

Wiring is simple. Eliminate all the lockouts (unless you're safe lol), One big side of the solenoid goes to the +battery, the other big side to the big terminal on the starter.
There might be a wire on the carb bowl...that goes to key on. The small wire from the + side of the solenoid gores to key start. (if there's a small terminal under the large negative terminal on the solenoid, it goes to ground.) One wire from the magneto goes to the +battery for charging and the other powers lights through the light switch. Unless it has an alternator, then those alternator wires feed the battery and lights. One last small wire comes off the coil and it goes the the off position on the ignition key and grounds out the coil to stop the engine.
 
Last edited:
They didn't have any wires to the carb bowl back then, won't be any unless someone did an engine swap. Should be able to rewire from scratch in an afternoon. Only thing is that whatever is on that circuit that caused the smoke might be no good any more. And maybe more than that, besides wiring.
I was able to find the terminals like what is in the starter switch connector pretty cheap online, not particular to roper, many applications use those same ones.
You can pop them out of the plastic connector piece with a small screwdriver, I use the ones that snap on used to give away the ones with the pocket clip and the little magnet on the butt end of the handle. Better job that way vs splicing down the line.
When I do a job like that everything gets soldered and heat shrink. Everything.
No crimp style butt connectors, and PLEASE DON'T use scotchloks. EVER!
 
I completely re-wired my Roper 20T. Here are some helpful links.
 

Attachments

  • Roper Wire.jpg
    Roper Wire.jpg
    118.6 KB · Views: 11
Just make ABSOLUTELY certain that there is NEVER power to the CDI. (Ignition unit)
If you do, it'll be $150+ to fix.

Just a heads up to save you some heartache

Ripped battery out first thing... cuz all the wiring is under battery tray

Now for questions... does “deleting” pto safety switch wires affect starting? That’s the “top”/vertical male connection on ignition when looking from engine bay. Have my ugly mitt on it in pictureimage.jpg

If it does, how do I “bypass” the pto switch/sensor? Never intend to run pto attachments, only push blade and tillage equipment...
 
Last edited:
You can run a jumper wire in the connector. If you are re-wiring, just leave out that circuit of wires. My Sears only has the PTO lever safety for the mule drive left in tact.
 
Don't worry about the insulation on those wires it's just there to make the wires look pretty. :eek:
Wiring on a garden tractor is pretty basic stuff. Just go one wire at a time. Find it's starting and ending points and replace it. Make sure all your connections are good. This might be good time to check out U-tube for help about rewiring a GT.
 
Does the amp meter need to be hooked up for battery to charge?

Been coming to a basically dead battery any time I try to bark up the roper...
 
Back
Top