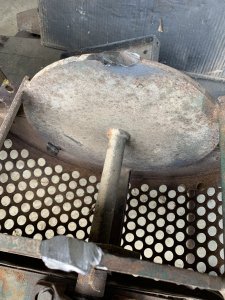
I was thinking the same thing!I’m not trying to be a smart a$$ but can’t really tell from the pictures, did you take the two bolts out of the taper lock where they were and put them into the other two holes? That will pop the pull off of the taper and the whole thing SHOULD come off pretty easily.
You are using an out of date browser. It may not display this or other websites correctly.
You should upgrade or use an alternative browser.
You should upgrade or use an alternative browser.
Kemp K6CH Wood Chipper
- Thread starter Sawdust
- Start date
Just put some pressure on the hub with the pusher bolts and smack the hub with a brass punch and hammer and they should seperate. If not apply some torch heat to the hub and repeat. If you overtorque the pushers the it will break the taperlok. What exactly did you cut?
Last edited:
I did heat and smack but no go. What I cut off were the three bad bars ( angle iron) off of the drum that had the broken corners. I slept on it for awhile about repairing the corners. I was worried that would be a serious weak point so I decided to just cut the bad ones off and make new ones. Although they were welded good on all four sides of contact to the drum it wasn’t that bad cutting them off.Just put some pressure on the hub with the pusher bolts and smack the hub with a brass punch and hammer and they should seperate. If not apply some torch heat to the hub and repeat. If you overtorque the pushers the it will break the taperlok. What exactly did you cut?
Did you scratch your head Kenny while thinkingI was thinking the same thing!
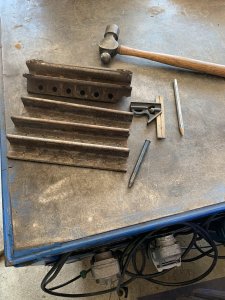
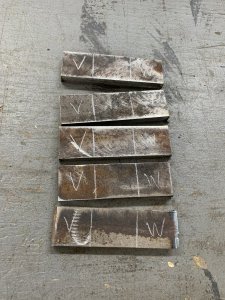
I haven’t had much time for this like I wanted. I cut my new angle iron cutter bars, marked them, and center punched for drilling. I used three different size drill bits graduating me to what I needed. Instead of drilling 21 holes I actually drilled 63.  Next up I’ll chamfer the edges of the bars where I’ll be welding, and I need to grind away the old welds on the drum.
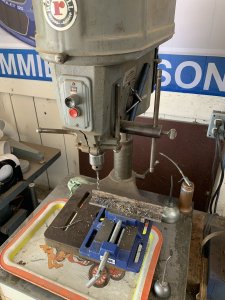
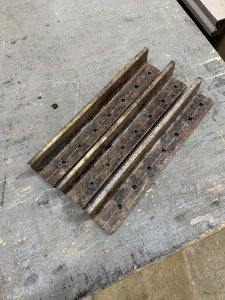
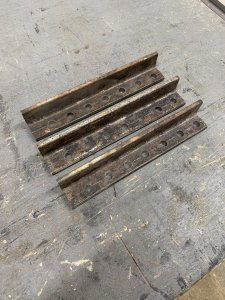


Had a good day in spite of our surprise heat wave of upper 90’s after some really nice Fall weather for a couple of weeks. I cut my cutter sections a little long not knowing how much length the twist would use up. What I did was measured the 1” needed for the hole end and mounted that in the vise since that was a given. I then started out with 1 3/4” space between the vise jaw and the side of my pipe wrench for the twisted area.
The twist was way too long. I decreased it to 1 1/2” but was still too long. I decreased it again to 1 1/4” and perfect! These two are my mistakes that were too long.
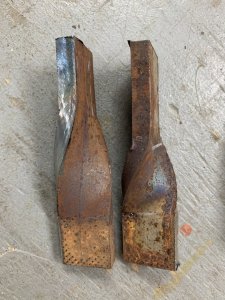
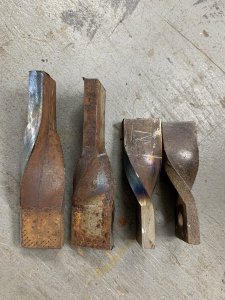
I heated up the twist area with an acetylene only torch for 4 minutes and the bend worked out nice. I was able to make 3/4 of the twist then I had to reverse the pipe wrench for the rest of the bend. I had a 3’ section of galvanized round fence post slid onto the wrench for leverage. If you look I placed a washer on the bottom end of the pipe wrench jaw to give me an even grip contact on the metal.
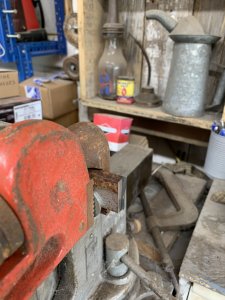
After the first twist I realized I twisted in the wrong direction so I went to the other side of the vise. Lol
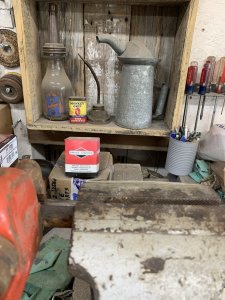
The cutter ends were around an 1/8” too long from the end of the twist. I expected them to need trimming since I allowed myself a little wiggle room after the twist. I only needed 4 but while I was at it I made a total of 8. I only drilled the four I needed. I have to quit for the day it’s 100 degrees in the shop but not bad in front of the fan. Next up I’ll take a file and make sure all the cutters are squared up then weld the bars that I made to the drum. It’s going to be interesting to see what it takes to balance this. The cutter at the bottom far left is the original one. They all look a little off in the pic but I can tell you they are dead on the original. I’m very pleased on how this ended up for a Sawdust maker.
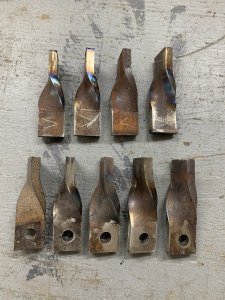
The twist was way too long. I decreased it to 1 1/2” but was still too long. I decreased it again to 1 1/4” and perfect! These two are my mistakes that were too long.


I heated up the twist area with an acetylene only torch for 4 minutes and the bend worked out nice. I was able to make 3/4 of the twist then I had to reverse the pipe wrench for the rest of the bend. I had a 3’ section of galvanized round fence post slid onto the wrench for leverage. If you look I placed a washer on the bottom end of the pipe wrench jaw to give me an even grip contact on the metal.

After the first twist I realized I twisted in the wrong direction so I went to the other side of the vise. Lol

The cutter ends were around an 1/8” too long from the end of the twist. I expected them to need trimming since I allowed myself a little wiggle room after the twist. I only needed 4 but while I was at it I made a total of 8. I only drilled the four I needed. I have to quit for the day it’s 100 degrees in the shop but not bad in front of the fan. Next up I’ll take a file and make sure all the cutters are squared up then weld the bars that I made to the drum. It’s going to be interesting to see what it takes to balance this. The cutter at the bottom far left is the original one. They all look a little off in the pic but I can tell you they are dead on the original. I’m very pleased on how this ended up for a Sawdust maker.

It was near 100 two days ago here so that heat wave is hitting you now i suppose! Maybe this cool air we have now will follow. Almost a little too chilly for my attitude though! Scares me the "S" word isn't far away!
Nice job building those cutters, Jim! Would tempering them make them too brittle? Maybe that's why the factory teeth didn't seem too hard.
I like the oil can/ bottle display too!
DAC
Nice job building those cutters, Jim! Would tempering them make them too brittle? Maybe that's why the factory teeth didn't seem too hard.
I like the oil can/ bottle display too!
DAC
I’m not sure on tempering them I thought about that until I dragged a file across one of the originals. I’m thinking they need to flex slightly. These are designed to shred brush not chip branches. I think someone tossed that rock in there just to see what happened. I don’t think these would have had that much damage under normal use. I’ve seen people shove branches in there on YouTube just to show what it will do.It was near 100 two days ago here so that heat wave is hitting you now i suppose! Maybe this cool air we have now will follow. Almost a little too chilly for my attitude though! Scares me the "S" word isn't far away!
Nice job building those cutters, Jim! Would tempering them make them too brittle? Maybe that's why the factory teeth didn't seem too hard.
I like the oil can/ bottle display too!
DAC
Jim/Sawdust,
I have a Kemp K4CH and have enjoyed reading your rebuild. I was wondering if you had to replace the centrifugal clutch at all. Mine kicked recently and I've been looking for a replacement. I haven't been having the greatest luck trying to match the pulley size on it. Might be leaning toward rebuilding it at this point, but I was hoping someone may have been here before me and figured out a 21st century replacement part.
I have a Kemp K4CH and have enjoyed reading your rebuild. I was wondering if you had to replace the centrifugal clutch at all. Mine kicked recently and I've been looking for a replacement. I haven't been having the greatest luck trying to match the pulley size on it. Might be leaning toward rebuilding it at this point, but I was hoping someone may have been here before me and figured out a 21st century replacement part.
So far my clutch seems good except for grabbing slightly at idle it still wants to turn the drum. Once I get it going and get some piles chipped and shredded I’m going to take it apart and see what it might need. Are you familiar with some of the centrifugal clutches on go karts. They come in various shaft sizes that might work. By the way glad to have you aboard and welcome to our family.Jim/Sawdust,
I have a Kemp K4CH and have enjoyed reading your rebuild. I was wondering if you had to replace the centrifugal clutch at all. Mine kicked recently and I've been looking for a replacement. I haven't been having the greatest luck trying to match the pulley size on it. Might be leaning toward rebuilding it at this point, but I was hoping someone may have been here before me and figured out a 21st century replacement part.
So far my clutch seems good except for grabbing slightly at idle it still wants to turn the drum. Once I get it going and get some piles chipped and shredded I’m going to take it apart and see what it might need. Are you familiar with some of the centrifugal clutches on go karts. They come in various shaft sizes that might work. By the way glad to have you aboard and welcome to our family.
Thanks for the welcome. I would say I am gaining familiarity with go cart clutches as my search for a replacement persists. What I have found is that go carts these days more commonly use a chain driven clutch while the Kemp K4ch uses a belt driven clutch. So although some go cart makers have belt driven clutches, they have less variety and I cannot seem to find a clutch with a pulley having a 4.5" OD. The go cart makers appear to max out at a pulley OD just over 3". I have an email out to the Midwest go cart maker Max-Torque to see about a custom build. Alternatively, I could try to keep the bones of my current clutch and potentially replace the shoes/springs. I guess I was just hoping for a little easier plug and play as my fall cleanup is quickly approaching. My last option is use a smaller pulley OD and then get out some pencil and paper to change the pulley driving the knives to a proper size to ensure the same RPM at the knife side. I've done that before on a vintage bandsaw rebuild when I acquired a bandsaw where someone put an oversized motor hoping for extra hp but clearly had no understanding of the cutting speed. My issue there is that a belt guard is nice and often the new pulley doesn't fit in the same envelope. All part of the process I guess. Let me know what you encounter with your clutch.
Can you link those videos.I’m not sure on tempering them I thought about that until I dragged a file across one of the originals. I’m thinking they need to flex slightly. These are designed to shred brush not chip branches. I think someone tossed that rock in there just to see what happened. I don’t think these would have had that much damage under normal use. I’ve seen people shove branches in there on YouTube just to show what it will do.
Don
I never saved any of them but you can search on YouTube for Kemp shredders and find dozens.Can you link those videos.
Don
Well good news and bad news. The good news is I welded my new bars on yesterday, it took almost 2 hours sharpening 42 cutters at 5 sides each. It took me awhile to get the drum balanced but temporarily fastened washers where needed. I’ll weigh them out and then do something permanently later.
The bad news is, as I was gently and carefully tightening up the expansion hub into the drum pulley I heard a pop. I cracked one of the pulley spokes. The crack starts at the meaty part of the hub and travels outward into the spoke above. I can’t believe this I was so careful. I did start it up at idle then raised it a little and this thing runs so smooth. All this work and I basically destroyed it for now. I have a small welding shop near me that I buy metal from, I’ll take it to them to see what they can do for me. I took it off to release the pressure on it and the crack closed to where you can barely see it…feeling like crap now.
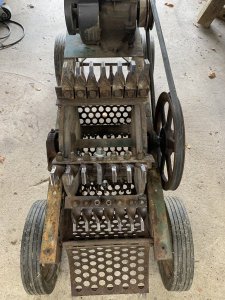
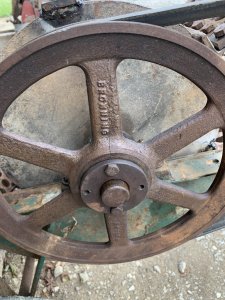
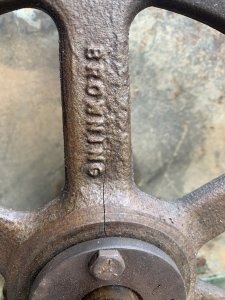
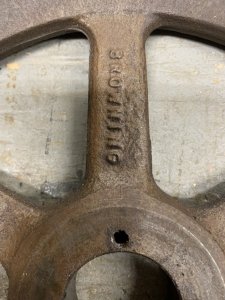
The bad news is, as I was gently and carefully tightening up the expansion hub into the drum pulley I heard a pop. I cracked one of the pulley spokes. The crack starts at the meaty part of the hub and travels outward into the spoke above. I can’t believe this I was so careful. I did start it up at idle then raised it a little and this thing runs so smooth. All this work and I basically destroyed it for now. I have a small welding shop near me that I buy metal from, I’ll take it to them to see what they can do for me. I took it off to release the pressure on it and the crack closed to where you can barely see it…feeling like crap now.


I started searching for this pulley a few days ago. The Browning Pulley Co started in 1885 and pretty much dominated this industry until 1986. Their pulleys are everywhere and so many different styles and designs. The one I have prices from $120.-$185. plus shipping and taxes. I went back online last night and found one on eBay brand new still in the box for $56. with free shipping. On top of that the seller offered the option of make offer. I offered $48. thinking he would counter for $50. but he excepted my offer this morning. It’s suppose to arrive on Monday and hopefully I can get this up and running. I am super happy over this. I thought I would price these before I took it to have it welded, so this is much better than something repaired running like this thing does.


I had the same exact thing happen on a air compressor fly wheel pulley once. Never did know what I did wrong. But boy was I careful on the next one..Made sure the sleeve was clean and used anti seize. And didn't go crazy tightening it..I started searching for this pulley a few days ago. The Browning Pulley Co started in 1885 and pretty much dominated this industry until 1986. Their pulleys are everywhere and so many different styles and designs. The one I have prices from $120.-$185. plus shipping and taxes. I went back online last night and found one on eBay brand new still in the box for $56. with free shipping. On top of that the seller offered the option of make offer. I offered $48. thinking he would counter for $50. but he excepted my offer this morning. It’s suppose to arrive on Monday and hopefully I can get this up and running. I am super happy over this. I thought I would price these before I took it to have it welded, so this is much better than something repaired running like this thing does.
View attachment 59625
We still use a ton of browning sheaves and taper locks at work. All steel though.
You can bet I’ll be nervous about this new one. I only brought the two bolts in a quarter turn at a time very slowly going back and forth from one bolt to another.I had the same exact thing happen on a air compressor fly wheel pulley once. Never did know what I did wrong. But boy was I careful on the next one..Made sure the sleeve was clean and used anti seize. And didn't go crazy tightening it..
