White 1855 Repairs

I sanded the Bondo down, primed again, then used some spot putty for some minor places I missed.
513ACABE-810C-4D43-A26E-741E61787CF0.jpeg5AC68637-115E-4DEF-84AC-D1125606F942.jpeg307E5846-8CAD-400E-B2AB-1416F2A7F1D7.jpeg
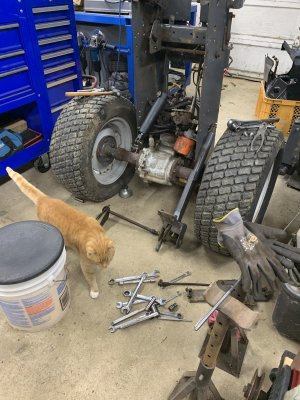
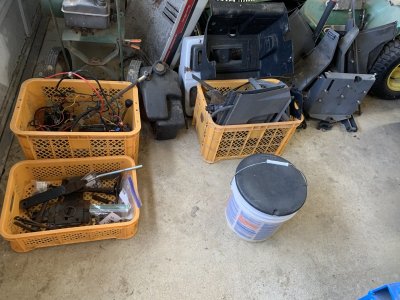
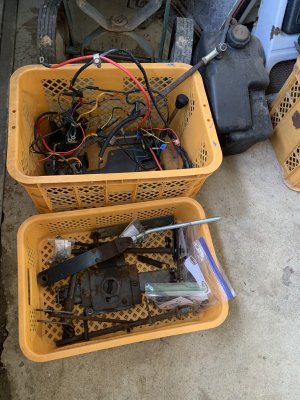
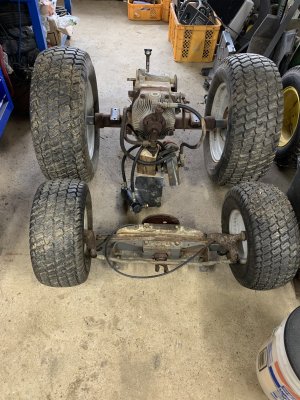
I took the dash box off along with some wiring. The more I take off the more I want to just do a nut and bolt rebuild on this.
2425F8EA-53DC-4615-8823-FB6D6F71A67E.jpeg787A196C-C547-4E97-B2EA-1D104EEC1F2B.jpeg
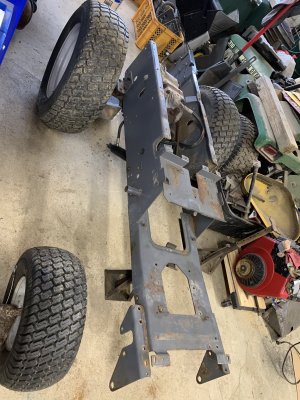
Here’s a few pics of minor rust that will only get worse if I don’t.
A6107C88-1C1F-4D7B-9A0B-4AD72D73F021.jpegC07F4787-20DF-431B-943F-E026DBCD262E.jpeg59BCECBA-07CD-45E3-B983-110F2095F5A7.jpeg
I have a special feeling using a tractor that I know I have totally redone everything on it to bring it back to original as much as I can.
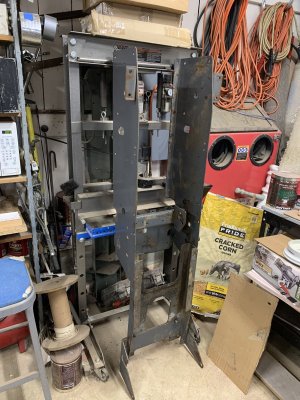
 
I probably would have filled the holes for those fender lights... I know they are oem but they just dont work for me. Lol... otherwise they are are one of the better looking MTD built tractors out there.
My lenses are cracked but they are doable since I like the lights. If I can’t find any lenses I was thinking of some truck cab running lights might look good.
 
I sanded the spot putty then primed again so this fender pan is ready for the finish coat. I’ll hang it up somewhere until warmer weather along with the other body tins. The hood, side panels, and running boards are in good shape with a little rust around the bolt holes.
F4B539BD-2BCE-47CC-9EA7-13FD4CBD8A4C.jpeg
I started taking the front PTO and cross member off. I never seen so many bolts in such a small area. I was able to jack the frame up and the front end just slid down.
5D69B4BD-FCDE-4185-952E-FBAC916D14FF.jpeg
It looks like the front end alone will be a small project taking everything apart getting it cleaned and painted. Once I get everything apart I’ll put the parts in bins. I can clean and paint as I have time. This way it won’t take up so much room in the shop. My winter project was suppose to be installing my dust collector system I’ve had for two years.
4A8D20D8-9CD3-4DDC-8F3C-FBAB2C8F71DB.jpeg
Here is a couple of inspirational pics of my other two tractors I done. Looking at these helps me remember how nice it was getting one completely done ready for the body.

Bolens H16
01A02698-A308-4777-9F37-574E68E118D3.jpeg

MTD990
54DD91FD-AB43-4478-B47F-F88477C4C9AF.jpeg
 
I tried to find lenses or complete lights for my1655 a couple years ago when I got it. NLA every place I looked. Even tried the salavage yards around they were all broke or not there. Mainly wanted them to cover the base and holes up. Those lights are in a real vulnerable location. Never did bother with working lights on any of my tractors. The 1862 Cub does have lights that work but they were working when I bought it.
 
Not a lot going on earlier in the week just too cold but yesterday and today I was able to get the frame completely stripped. I took a lot of pics but there is a lot of linkages, and bushings that may be a challenge later. All the bolts came loose very well most once loosened I was able to unscrew with my fingers. I really don’t think this was used much. A lot of the areas that should have wear like no paint still has the factory paint. I’m going to keep the rear end, axle, and tranny as is just clean it up and paint the axle only leaving the cast aluminum tranny as is for heat transfer. Now I’ll just clean and paint as I can.
 

Attachments

  • B8DC948A-5BF0-47DC-994F-26A7021C4CCF.jpeg
    B8DC948A-5BF0-47DC-994F-26A7021C4CCF.jpeg
    246.8 KB · Views: 14
  • 604EF3F1-7473-47FB-B168-E3024F5C51EB.jpeg
    604EF3F1-7473-47FB-B168-E3024F5C51EB.jpeg
    273.1 KB · Views: 13
  • CDD7FDAC-EC8F-4A7D-9F74-22243573AAB0.jpeg
    CDD7FDAC-EC8F-4A7D-9F74-22243573AAB0.jpeg
    245.1 KB · Views: 10
  • 5340DC3A-6BE3-4D2F-9122-839FEF0DB8A4.jpeg
    5340DC3A-6BE3-4D2F-9122-839FEF0DB8A4.jpeg
    245.7 KB · Views: 10
  • A3FBC3B5-F424-49EC-BBD5-AA427555DE43.jpeg
    A3FBC3B5-F424-49EC-BBD5-AA427555DE43.jpeg
    296.5 KB · Views: 10
  • 7A8124F8-648B-42E4-9F6B-F2E9950F81F0.jpeg
    7A8124F8-648B-42E4-9F6B-F2E9950F81F0.jpeg
    247.1 KB · Views: 13
Definitely a work horse of a tractor. If I had a good engine for mine I would do the swap and keep it. But don't have the engine and don't need/want the extra tractor around. Getting rid of work I don't need or have the ambition to do.
 
Definitely a work horse of a tractor. If I had a good engine for mine I would do the swap and keep it. But don't have the engine and don't need/want the extra tractor around. Getting rid of work I don't need or have the ambition to do.
Did you keep the turfs on the back of yours Roger. Mine are the originals but in good shape with minor cracking. I’m thinking of tubing them and use chains, that’s a really good combo for me. Because of the 15” wheels I’ve been shopping for truck chains. It has 18” in the front which have no cracking.
 
Stayed with the turf and put a set of chains on it. Has weights on the rear also. Chains are either tuck or car chains. Has 3 point but lower arms were made at a welding shop as they were not there. Rescued two tractors several years ago before the Missouri River flood claimed them. Hard to believe that several years ago the river was 10 miles wide and flooded millions of A. Now they can't get a barge up to Omaha to ship grain out.
 
I knew this front end PTO would be a project in a project but not this much. I had two choices removing the large pulley or the yoke in order to split this carriage to get the pivot arm out. I’ve never done one of these before.
2506A562-7318-4CFE-9C6E-538C9DCF10FB.jpeg
B00725E6-834C-44E8-BF05-E0C8C6D6DC4C.jpeg
4058197B-1BF9-44C5-B232-EE16F5A262D6.jpeg
The yoke end has a spring loaded sleeve that compresses two balls onto the shaft. By sliding this sleeve down it takes the pressure off of the balls allowing the yoke to be removed. The yoke is a little damaged. The bearing cups of the universal joint are stuck inside and the legs of the yoke have been spread apart some. I’ll probably never use this front PTO but I want to repair it right.
9C413236-1586-4346-AC83-86C97A35DEDF.jpeg29740609-E797-4566-9D31-A7449E4C28EF.jpeg
My sand was too wet to use for SB so I cleaned up the spindles on my bench grinder with a wire wheel and a few other parts for priming. I can’t believe how heavy duty this tractor is along with 1” spindles but they used a hard plastic for the bushings. After over 40 years they are still in good shape.
13A39A17-1CD0-43EB-B540-9A78032C5820.jpeg
 
Today I dried out a couple of 50lb bags of play sand for some SB. I only used about 20lbs to get what I needed done.
08952802-5CF9-4412-8650-FF39A45725E3.jpeg
I have three bins of parts plus the sheet metal to do. I cleaned up one bin the other day so today I SB, primed all the parts and top coated a few pieces. I had to keep a fire going to keep the parts warm before painting.
BB6DFF5C-F1AC-43E8-9EBC-6566EE2268E8.jpeg5F749FBC-365A-4432-A2D8-66B4F4444206.jpegDACDCBF1-C6D0-42AB-B817-F07387AD4683.jpegE2A8D549-BF20-473A-964B-555076B3D9ED.jpeg770B1B2F-6F0A-4CCC-B41F-2036E54F3168.jpeg553EFE14-43EF-4035-8F75-A4EE255E2709.jpeg

It might be awhile before I do much more in the way of painting. We’re getting 2” of snow overnight and getting colder most of next week. The Charcoal Gray I’m using is available in quart cans for about $16. which isn’t bad at all. I think I’ll get that when I do the frame and fender pan and use a spray gun.
 
Got some parts painted and since this project is dragging I decided to pack them away for later.
B15E942E-0558-4736-9629-7A6584FCBA84.jpeg36A70EA1-E1FC-4E2B-AB6A-B74332FF894A.jpeg
This PTO assembly has been challenging trying to get it separated to get the parts cleaned and painted. I had two choices of removing the bearing on one side or the pulley on the other. I’ve been soaking and heating the pulley and shaft for several days off and on. Finally yesterday it slipped right off. I got all the parts cleaned and ready to prime.
264CACEB-78F5-47A3-9913-FB9CABBADA87.jpegF7B899AB-5875-4345-9A90-13F56C641A0E.jpegEF7729B0-751D-4060-BB14-64F88E8881F4.jpeg1D0CEFBA-1C6C-4F15-AF1D-5CA566B30E57.jpegABA83027-CCC2-4FB5-A854-46EB0AA4DF49.jpeg
 
Back
Top