1947 Farmall Cub project

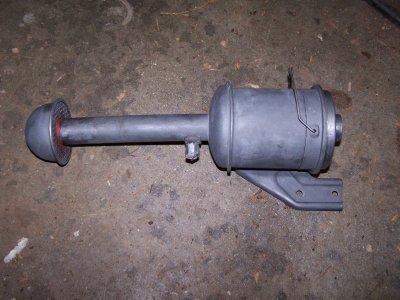
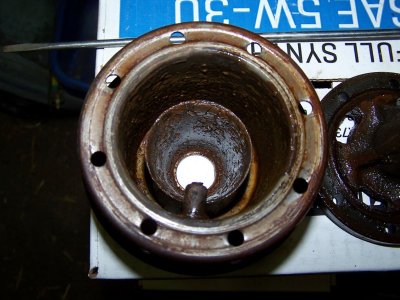
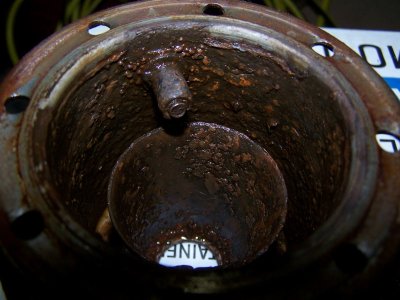
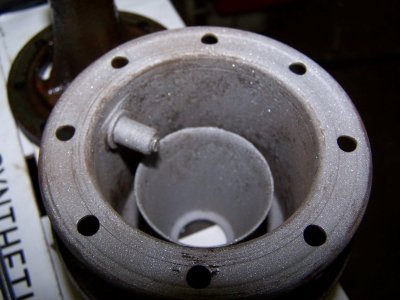
Drilled out the spot welds and removed the bad hood. This will make handling the tank easier during the cleaning process. If this tank cleans up good, I will remove the hood from the rust thru tank and install on this one. I don't know if I am making progress or just digging the hole deeper at this point.

GOPR2529-m.JPGGOPR2531-m.JPGGOPR2532-m.JPGGOPR2535-m.JPGGOPR2536-m.JPGGOPR2537-m.JPGGOPR2538-m.JPGGOPR2539-m.JPGGOPR2540-m.JPGGOPR2541-m.JPG
 
My brother came over with his grandson today to do some work on the engine for this cub. He had his grandson turning wrenches, tapping holes, and torquing bolts. They torqued the rod bolts, installed a new rear main seal, and bolted the pan down. Then moved on to head installation. He is going to try to get back next weekend to install the manifold, carb, and a few other parts. Anyway, this is progress, and his grandson is getting his hands dirty.
 

Attachments

  • GOPR3224-m.JPG
    GOPR3224-m.JPG
    190.7 KB · Views: 14
  • GOPR3225-m.JPG
    GOPR3225-m.JPG
    190.2 KB · Views: 14
  • GOPR3226-m.JPG
    GOPR3226-m.JPG
    132.8 KB · Views: 12
  • GOPR3227-m.JPG
    GOPR3227-m.JPG
    182.8 KB · Views: 12
  • GOPR3231-m.JPG
    GOPR3231-m.JPG
    196.6 KB · Views: 14
Started prepping the engine for some paint. Pulled the governor off to free up the throttle rod pivot which came off with a little heat. Removed the starter, Mag, and fan and hit it with a knotted wire brush. Got a little more to do and then its paint time.
 

Attachments

  • 100_4455-m.JPG
    100_4455-m.JPG
    150 KB · Views: 6
  • 100_4457-m.JPG
    100_4457-m.JPG
    178 KB · Views: 6
  • 100_4458-m.JPG
    100_4458-m.JPG
    202.2 KB · Views: 7
  • 100_4459-m.JPG
    100_4459-m.JPG
    203.4 KB · Views: 7
  • 100_4460-m.JPG
    100_4460-m.JPG
    219.8 KB · Views: 7
  • 100_4463-m.JPG
    100_4463-m.JPG
    174.3 KB · Views: 6
Looked over the engine and found some greasy area's and decided it needed a second cleaning. Scrubbed it with lacquer thinner and scotchbrite. Followed that with another wire brushing and finished it off with some Ospho to kill the rust. Need to prep the fan and manifold before I start painting.
 

Attachments

  • GOPR3262-m.JPG
    GOPR3262-m.JPG
    177.3 KB · Views: 6
  • GOPR3263-m.JPG
    GOPR3263-m.JPG
    169.3 KB · Views: 6
  • GOPR3264-m.JPG
    GOPR3264-m.JPG
    204.4 KB · Views: 6
I have had real good luck using cheap oven cleaner from Dollar General Store. Have to use gloves and eye protection when using it, washed off with cold water and garden hose nozzle.
 
Last edited:
Finally got around to spraying some epoxy primer on the cub engine.
 

Attachments

  • 100_4498-m.JPG
    100_4498-m.JPG
    140.3 KB · Views: 3
  • 100_4499-m.JPG
    100_4499-m.JPG
    144.1 KB · Views: 3
  • 100_4500-m.JPG
    100_4500-m.JPG
    134.4 KB · Views: 4
  • 100_4501-m.JPG
    100_4501-m.JPG
    150.7 KB · Views: 4
  • 100_4502-m.JPG
    100_4502-m.JPG
    154.5 KB · Views: 4
While looking through the boxes of cub parts that we have I picked up a fan assy and thought the blades looked short. When I compared it to this power unit fan assy sure enough the power unit fan is larger diameter. Also looks like the drive pulley is bigger diameter. Guess I need to clean up another fan to use for this tractor.
 

Attachments

  • 100_4503-m.JPG
    100_4503-m.JPG
    186.5 KB · Views: 3
  • 100_4504-m.JPG
    100_4504-m.JPG
    218.7 KB · Views: 2
  • 100_4505-m.JPG
    100_4505-m.JPG
    192.6 KB · Views: 3
  • 100_4506-m.JPG
    100_4506-m.JPG
    199.3 KB · Views: 3
Must have been a bigger radiator on the power unit and maybe an alternator?
I'll have to measure the power unit radiator and see how much larger it is. This power unit was on our small pull-type combine and was a hand start only setup. No charging system or starter ring gear on the flywheel. The belt on the crank pulley ran the larger pulley on the fan.
 
Primed the air cleaner, but the fan shaft was stuck. It wasn't bad and broke free easily with a wrench on it. Decided to take it apart, which was a good thing. must have had water in it at one time and got a little rusty along with some sludge build up. Ran the pulley/hub thru the sandblast cabinet to clean it up and wire brushed the shaft followed by some emery cloth. Treated all of it with Ospho and will prime it tomorrow.
 

Attachments

  • 100_4508-m.JPG
    100_4508-m.JPG
    136.7 KB · Views: 3
  • 100_4509-m.JPG
    100_4509-m.JPG
    157.6 KB · Views: 3
  • 100_4511-m.JPG
    100_4511-m.JPG
    228.5 KB · Views: 3
  • 100_4512-m.JPG
    100_4512-m.JPG
    183.6 KB · Views: 3
  • 100_4513-m.JPG
    100_4513-m.JPG
    157.4 KB · Views: 3
  • 100_4515-m.JPG
    100_4515-m.JPG
    172.5 KB · Views: 3
  • 100_4517-m.JPG
    100_4517-m.JPG
    145 KB · Views: 3
  • 100_4518-m.JPG
    100_4518-m.JPG
    174.4 KB · Views: 3
  • 100_4519-m.JPG
    100_4519-m.JPG
    189.9 KB · Views: 3
  • 100_4525-m.JPG
    100_4525-m.JPG
    101.2 KB · Views: 3
A few more pics including a couple manifolds and water pipes. Not sure which manifold we are going to use yet.
 

Attachments

  • 100_4520-m.JPG
    100_4520-m.JPG
    197 KB · Views: 3
  • 100_4522-m.JPG
    100_4522-m.JPG
    168.4 KB · Views: 3
  • 100_4524-m.JPG
    100_4524-m.JPG
    129.9 KB · Views: 3
  • 100_4526-m.JPG
    100_4526-m.JPG
    151.9 KB · Views: 3
Bought a pipe tap to clean up the threads in the manifold. We already had this old pipe threader to clean up the pipe.
 

Attachments

  • 100_4552-m.JPG
    100_4552-m.JPG
    210.2 KB · Views: 6
  • 100_4554-m.JPG
    100_4554-m.JPG
    145.4 KB · Views: 6
  • 100_4556-m.JPG
    100_4556-m.JPG
    165.2 KB · Views: 6
  • 100_4557-m.JPG
    100_4557-m.JPG
    213.3 KB · Views: 6
  • 100_4558-m.JPG
    100_4558-m.JPG
    252.7 KB · Views: 6
I've been waiting for a little warmer weather so I could get the shop warmed up enough to paint. I was hoping for a 50°F+ day but today it got up to 43°F which is the warmest predicted for weeks and I needed to get this done. Loaded up the wood furnace and fired up the propane heater and got the shop up to 60°F. Mixed the paint and sprayed some red finally. I still have the fan assy, starter, and a few other small parts to spray.
 

Attachments

  • 100_4573-m.JPG
    100_4573-m.JPG
    137.6 KB · Views: 7
  • 100_4574-m.JPG
    100_4574-m.JPG
    159.9 KB · Views: 7
  • 100_4575-m.JPG
    100_4575-m.JPG
    148.9 KB · Views: 7
  • 100_4576-m.JPG
    100_4576-m.JPG
    131.9 KB · Views: 7
  • 100_4577-m.JPG
    100_4577-m.JPG
    149.3 KB · Views: 7
  • 100_4578-m.JPG
    100_4578-m.JPG
    174.8 KB · Views: 7
  • 100_4579-m.JPG
    100_4579-m.JPG
    104.9 KB · Views: 7
  • 100_4580-m.JPG
    100_4580-m.JPG
    99.6 KB · Views: 7
Back
Top