
You are using an out of date browser. It may not display this or other websites correctly.
You should upgrade or use an alternative browser.
You should upgrade or use an alternative browser.
What are you currently working on??
- Thread starter backwoods
- Start date
bought me another Lawn boy that is older than the "instant stop" release handle Saturday, got it running easily, since it aint currently raining (we have had our share the last 3 days) and the grass has shot up over those last 3 days like it hasn't done since mid June, I think I'm gonna go try it out so I can finish before dark.... I hate short days. and long nights. daylight is getting too short.
Drove the Rambler Sunday. Was sore from the wood cutting and splitting, on Saturday. So, I relaxed. Back to the wood splitting Monday.
Noel
Since you were beat-up from all the work on Saturday, the Rambler was a great choice on a drive! If you got too tired all you had to do was pull that lever beside the seat and recline it back into a bed! I THINK that the seats still did that on later ones, my '63 Classic did that.
DAC
I remember there was a bracket you could stick in a couple of holes under the rear seat to support the front seat back when fully reclined. It firmed it up like the front and rear was solid.Ya Doug. Just click, click, up and down on the handle until the back was down. The 64 we have does that. The 68 my parents had did too.
Noel
DAC
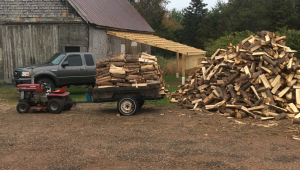
Wood all split today. Now it has to be stacked in the wood shed. This weekend. Maybe. Weather is not good for the next week. And winter is coming. Got caught last year with every thing not done. Got snow early November.
Treated the wood on my trailer today too. Weather is changing quick. Hard to get every thing done.
Noel
Treated the wood on my trailer today too. Weather is changing quick. Hard to get every thing done.
Noel
Attachments
A quick project for simple weed control in the garden patch and drawing rows but definitely not for heavy use at all , my goal is to get a bit more height as the other tractors just don't have enough row clearance
 everything else removed except the steering , engine mount plate and rear axle mount side plates, but i have have sat a 5 speed transaxle diff under from a Rover Rancher mid 80's Rider mower

 < this is all the components removed from the Rancher 2 and i will be using some of the parts back in the setup as i go along including the r/h pedal , pulley set and g/box mount plate because of the V belt clutch system , this will save me making alternative parts assorted
Diff is set and mounted ,turned out nice

 ,the extra plates behind the diff is to mount the 3 point lower control arms to (only a lite set)
i am going to use the old rear cover seat mounting cover off the lawn tractor i am painting Green and red for this job as it has the guards removed
Shane
everything else removed except the steering , engine mount plate and rear axle mount side plates, but i have have sat a 5 speed transaxle diff under from a Rover Rancher mid 80's Rider mower < this is all the components removed from the Rancher 2 and i will be using some of the parts back in the setup as i go along including the r/h pedal , pulley set and g/box mount plate because of the V belt clutch system , this will save me making alternative parts assortedDiff is set and mounted ,turned out nice
,the extra plates behind the diff is to mount the 3 point lower control arms to (only a lite set)i am going to use the old rear cover seat mounting cover off the lawn tractor i am painting Green and red for this job as it has the guards removed
Shane
Lovin up on the roper rt16
New battery, and seat that I stole off the suicide mower... no more leaving it for a week with the seat flipped only to get a wet @$$ yay!
New battery, and seat that I stole off the suicide mower... no more leaving it for a week with the seat flipped only to get a wet @$$ yay!
Started the walk behind thrower started the other day so it is ready. Going to mount the Cub thrower on the 1650 this morning. Put the chains and wheel weights on also. Need to clean the flue for the fireplace and the basement corn/pellet stove. Will pick up 2 ton of wood pellets when they let me know they are in. Do it on Tuesday or Wednesday. 5% discount those days, military & senior discounts.
That little MF7 is getting a work out!
Todays project was to put the snowblower on the IH Cub 1650 that I re-motered. Slid the mule drive on and saw I had to move the driven pulley about 3/4". Pulled the drive went after moving the pulley. Was new last season but boy was that thing siezed. Soaking in BP finally got it to move with a socket over the shaft and a big hammer. Got it set in place and back on the tractor. Belt went on OK and tightened up good. Rest of the blower unit went on the usual way. Lot of lifting, sliding, wiggling and got the pins and R clips all in. PTO shaft even stayed in place. Adjusted the chain as it had stretched out from last year. Fired it up and it ran good and quiet. Adjusted the lift rod to get it to raise higher and it was done. Now when it get warmer weather will put a coat of paint on the chute and it will be ready to go. Hope in don't have to wrestly the 75 lb wheel weights that were on it when i got the unit.


Last photo show why the fuel tank is on the back. Only about 5.5 - 6 " between the engine and the hydraulic valve and the same between the hoses and the top.
Last photo show why the fuel tank is on the back. Only about 5.5 - 6 " between the engine and the hydraulic valve and the same between the hoses and the top.