My MF7 is a 1970, and it has the zirks.This year is this tractor's 50th birthday, Chris. The MF8E has it's 60th birthday this year. The 8E has the zirks. Somewhere in that 10 year span they cheaped out!

You are using an out of date browser. It may not display this or other websites correctly.
You should upgrade or use an alternative browser.
You should upgrade or use an alternative browser.
And more junk.
- Thread starter MFDAC
- Start date
Ok, somewhere between '70 and '75 they dropped the zirks! Thanks, Nick!My MF7 is a 1970, and it has the zirks.
DAC

Looks like it would work real well, Chris, but this animal has to be 9" long. Would take quite a bit of fabricating to build that.As far as the Lovejoy goes you could put a sprocket on each shaft and wrap a chain around them. This allows for a little movement but keeps things aligned.
View attachment 93301

Holy crap, a buck a piece for grease zirks? Dang! Post a pic of what those drive in ones look like if you get a chance, Daniel.All the talk about drive on grease zerks caused me to order 10 in 3/16" and ten in 1/4". $1 each! Didn't fine an assortment box, but even if I did, it would be cost prohibitive!!
Got the deck on. Raised it up to hook up the lift link.

Didn't get the oil changed yet. Got sidetracked on another problem. Some of you may remember that I had a lengthy build thread on GTT about doing this repower clear back in 2015. I decided to take the hood and grill off to check things out. You may be able to see the base for the air filter is badly warped! I had to chop up the Predator housing to make things fit under the hood.

Took that housing off and chopped off the stuff that was warped the worst, right up to where it drops down to the carb.

Put it back on the engine and made a little stud with a point to help make a template from cardboard.

Look at the dirt that poor engine has been sucking in!
Template made just need to finish cutting it out.

Got out an old aluminum sign that's 1/8" thick. Scribed a circle on it at a half inch bugger than the pattern to give a little wiggle room.

Chopped off a rough circle with a cutoff wheel. Thought about a jig saw, but I have no metal blades and couldn't think of a way to hold it down. Don't have a bandsaw.

Finished the disc on the side of the chopsaw blade. That aluminum got hot fast! Had to wear winter gloves!

Actually was able to drill a hole using a lot of cutting oil and going slow with the el-cheapo hole saws I have! Drilled a hole for the stud where the X is too.

I have to do another post for the remaining pictures. Please keep reading!
DAC
Please read the above post too!
Did a test fit and looks like it might work.


Cleaned everything up with brake cleaner and used Gorilla epoxy to attach the plate to the butchered up base. Put a weight on it and anti seize on the bolt to align it. Didn't want to epoxy that bolt in! That old surface wasn't flat enough to just lay it on there, and it needs to stay put anyway.

Going to pull the carb and clean it, take out the spark plug and see if I can stick the bore scope in the hole to assess the damage to the engine. It was running fine last time it was used last fall.
Will leave that epoxy set overnight. Don't know how much I can get done tomorrow. Have to go to Sam's club and I have a doctor appointment too.
DAC
Did a test fit and looks like it might work.
Cleaned everything up with brake cleaner and used Gorilla epoxy to attach the plate to the butchered up base. Put a weight on it and anti seize on the bolt to align it. Didn't want to epoxy that bolt in! That old surface wasn't flat enough to just lay it on there, and it needs to stay put anyway.
Going to pull the carb and clean it, take out the spark plug and see if I can stick the bore scope in the hole to assess the damage to the engine. It was running fine last time it was used last fall.
Will leave that epoxy set overnight. Don't know how much I can get done tomorrow. Have to go to Sam's club and I have a doctor appointment too.
DAC
Making good progress, DAC.Please read the above post too!
Did a test fit and looks like it might work.
View attachment 93328
View attachment 93329
Cleaned everything up with brake cleaner and used Gorilla epoxy to attach the plate to the butchered up base. Put a weight on it and anti seize on the bolt to align it. Didn't want to epoxy that bolt in! That old surface wasn't flat enough to just lay it on there, and it needs to stay put anyway.
View attachment 93330
Going to pull the carb and clean it, take out the spark plug and see if I can stick the bore scope in the hole to assess the damage to the engine. It was running fine last time it was used last fall.
Will leave that epoxy set overnight. Don't know how much I can get done tomorrow. Have to go to Sam's club and I have a doctor appointment too.
DAC

Steering u-joints aren't rated to spin 3,000 rpm plus. I'm sure there are high speed smaller u-joints out there, but that's one more thing to buy, then the splined couplers and invent flanges to make it multi piece for installation. Think I'm better off dealing with this setup. Just going to have to line up the shafts fairly precisely. Still on the fence about spending 150-200 bucks for a couple of 11 spine couplers. What I took off was still working and the shafts on the tractor don't look any worse.Would a small steering U-joint work to replace the Lovejoy?
One would think that barbed fittings like that aren't much cheaper, actually they seem a lot more expensive, but the cost saving must be threading what they will get driven into. Pretty dumb idea in my opinion. Some engineer needs to be tarred and feathered---LOL!Here's pics of drive in grease fittings. 1/4" on left, 3/16 on right. You drill exactly that size hole and the ribs are oversized to drive in tight. I seldom need these thankfully due to their high costs. With KY sales tax, EACH one is $1.06!
View attachment 93360
Got a message on FB from the guy I gave the 1957 Wisconsin TF to. He sent a video of him starting and running it! Sounds real good!
Got home about 3:30 and went to work on the 12G again.
Took the weight off and the new baseplate seems to be attached well. Did a test fit before removing it.


Took it off and removed the carb. Cleaned the insides out with carb leaner, blew it out well and reassembled. Also cleaned around where the crankcase vent tube goes into the valve cover.

Pulled the spark plug and got the cheapie HF borescope out. The spark plug hole is so deep it is hard to get a good pic of the cylinder walls. Just used the cell phone for a pic of the scope.


That part of the cylinder still looks pretty good I think. The piston was at BDC.
Plug color was a bit dark like a little rich, but I cleaned it up, checked the gap and put it back in. Electrodes are still nice and sharp still.

Slid the carb back on and started final assembly. The air cleaner stud and the choke cable mount are crude inventions by me so things have to go together kind of all at once. Reassembly is done. Been raining all day so didn't want to start it and warm the oil up anyway.

DAC
Last edited:
Using a small u joint will handle the speed. They use them on PTO equipment a lot. I put one between a B&S 18 hp and the hydro that was a close line up and it ran for 2 years before I sold it. Did not spline either shaft either. Just ground a flat for the set screw to lock down onto the shaft.
Old sockets can come in handy many times Daniel. I have plenty of assortments just to bang and press on.The tool to drive them in is around $14, but I've always just used a socket that just slides over the fittings grease tip. The socket hits on the base, so it doesn't bang up the tip.
Crazy to see a predator running rich. They usually jet them so lean from the factory for “emissions”. A cone filter and exhaust on a 6.5 requires going up 3 to 4 jet sizes right off the rip to get it close, 1 size up on the pilot to help off idle throttle response and a different e-tube.
I like your air filter setup! I cant remember exactly what we did on the MF7. I know it required butchering the factory air box!
I like your air filter setup! I cant remember exactly what we did on the MF7. I know it required butchering the factory air box!
Last edited:
Thanks for the comment, Rog! Yes a PTO u joint should work fine. I should have thought about that more. Automotive steering column u-joints wouldn't hold up. I have used lots of them on racecars through the years. They aren't built to handle rpms. We used to get them out of junked Toronados and a couple others I don't remember anymore.Using a small u joint will handle the speed. They use them on PTO equipment a lot. I put one between a B&S 18 hp and the hydro that was a close line up and it ran for 2 years before I sold it. Did not spline either shaft either. Just ground a flat for the set screw to lock down onto the shaft.
I've built several tools out of old sockets too. 2 I can think of are a rear brake caliper adjuster for a 2011 Dodge Journey we had. The piston screwed out rather than just pushing out like a normal one. Glad Loree traded that thing off for the '06 Denali I drive now. Took a special socket to screw the caliper piston back in. Then I built a upper balljoint adjusting socket for a Dana 44 front 4x4 differential. Was too cheap to go buy the tools.Old sockets can come in handy many times Daniel. I have plenty of assortments just to bang and press on.
I only have cheap ones, Jim. No brand name. Just says "China" on them---LOL! I just go very slow and lots of cutting fluid. I think they came out of the scrap trailer at work too!Good fix on the filter base Doug. I need a good set of metal hole saw cutters. I’m tired of buying the cheapies. I’ve used some of the Bi-Metal cutters but still not too good.
This thing has run rich since day 1, Aaron. You got me thinking about carburation. I fought it for awhile and then gave up. I just don't let it idle much. I think I went to a .035 jet from the factory .040 At that time I couldn't find any smaller. Our altitude is about 3700 FT.Crazy to see a predator running rich. They usually jet them so lean from the factory for “emissions”. A cone filter and exhaust on a 6.5 requires going up 3 to 4 jet sizes right off the rip to get it close, 1 size up on the pilot to help off idle throttle response and a different e-tube.
I like your air filter setup! I cant remember exactly what we did on the MF7. I know it required butchering the factory air box!

I tried a carb that was supposed to be for a GX270 with adjustable idle mixture screw. It ran worse than the factory carb. May be the carb as it is a chinese knock off.

Have a rebuild kit for a GX270, but I must not have measured the jet. I will do that too. None of these floats work in the GX270 carb. The limiting tang is too long. The one in the carb that is in the tractor has a metal piece the needle rides on and is actually adjustable for float level I have it running slightly lower than level.


Long as I keep the rpms up it runs fine, but that plug does look rich. Sure would like to figure that out!
Didn't get much shop time today but still accomplished a little on the 12G.
Rubbed some black silicon into those gaps on the plastic part of the air cleaner housing. I don't think they are leaks as I put light and blew air into them and could feel or see nothing. Put a battery in it and hit the key. Cranked over. Then I dug out that carb stuff.


DAC
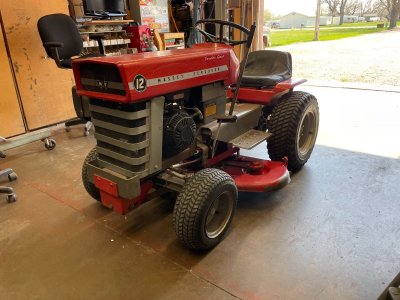
Got the MF12G ready to mow today. Fired it up, backed outside and let it warm up well.

Got the oil pump set up and brought it in to drain the oil.


That metric drain plug is in a bad spot and makes a huge mess. Pump does a clean job of it.
Put the hood and grill on and it is ready to mow.
The race was on so I wound a few rolls of line for the trimmer.

Probably do some mowing on Tuesday. Supposed to be rainy tomorrow and I have 2 doc appointments and have to go to Walmart to pick up meds.
DAC
Got the oil pump set up and brought it in to drain the oil.
That metric drain plug is in a bad spot and makes a huge mess. Pump does a clean job of it.
Put the hood and grill on and it is ready to mow.
The race was on so I wound a few rolls of line for the trimmer.
Probably do some mowing on Tuesday. Supposed to be rainy tomorrow and I have 2 doc appointments and have to go to Walmart to pick up meds.
DAC