What are you currently working on??

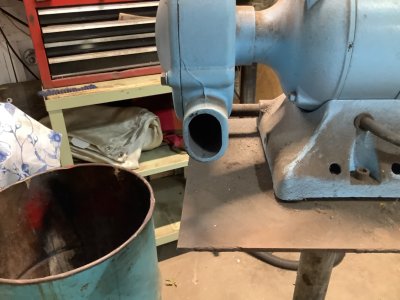
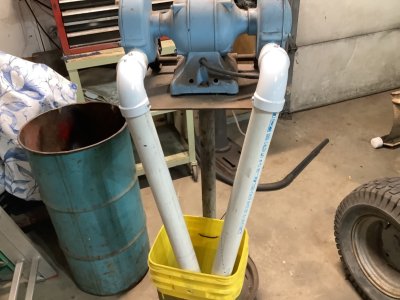
Made up a freebie collection system for my stand grinder. I had a leftover stick of 2”pvc and a pair of sweeps.
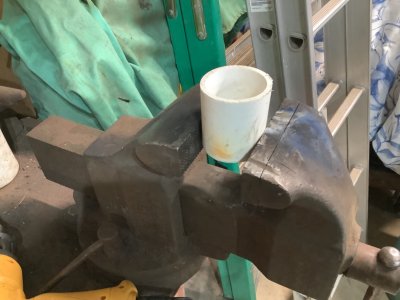
The outlet ports on the grinder are oval. Two short pieces of PVC, heat gun and a vise. I heated and distorted
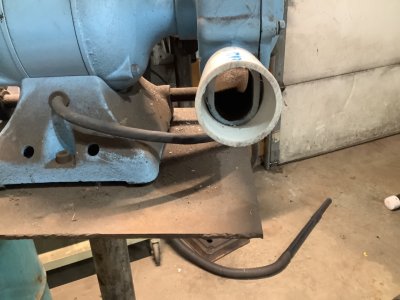
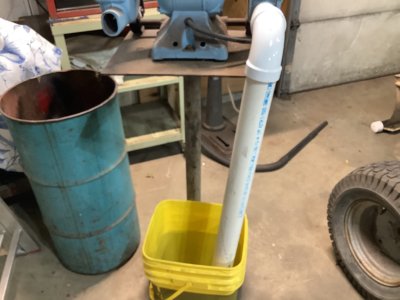
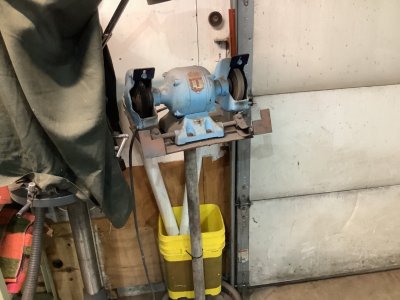
the pvc enough to force it onto the outlet ports. Attached the sweeps and two short pieces to feed into a bucket.
I used some self drilling screws instead of glue.
 

Attachments

  • IMG_1467.jpeg
    IMG_1467.jpeg
    265.3 KB · Views: 8
  • IMG_1470.jpeg
    IMG_1470.jpeg
    246.8 KB · Views: 8
  • IMG_1468.jpeg
    IMG_1468.jpeg
    261 KB · Views: 6
  • IMG_1469.jpeg
    IMG_1469.jpeg
    219.8 KB · Views: 7
  • IMG_1471.jpeg
    IMG_1471.jpeg
    268.5 KB · Views: 7
  • IMG_1472.jpeg
    IMG_1472.jpeg
    265.4 KB · Views: 7
  • IMG_1473.jpeg
    IMG_1473.jpeg
    240.8 KB · Views: 9
I really like that hammered paint it’s very durable. Did the hammering look develope like it should sprayed on the primer. I done the same thing you done and it looked just like regular paint. I used the same paint on bare metal and it hammered out well.

I very found very light coats gives less of a hammered look. I sprayed the wheels pretty heavy so yes they looked hammered
 
Can't believe I let my kid talk me into this but I'm getting my old Dakota ready for a plow for this winter.... He asked and asked and asked some more, I kept resisting. But then he showed up with a 6-1/2' Fisher plow that he found on marketplace and spent his money on...
I don't drive this one much anymore, was looking at sending it down the road. The seller said it came off a Dakota, then the dad came and said it was on a Colorado. They never had it mounted on anything, but the sellers grandpa has 3 early model Dakota's on his property next door.
Given the mounts we got with it there's no way it could have been on a Dakota. .. I'm about done modifying them to fit, came in the house to eat while I let my welds cool and the smoke to clear out of the garage...
Having a 2 post lift of my own plus a chop saw and a big 220v Miller mig is invaluable for a job like this ....no, I'm not welding the plow mounts to the truck. All bolt on so I can take it off of I want....
 
I found some rust on a box rib where it fastens to mount…of course the only way to fix this is remove the box…found a couple more areas on other ribs that need addressed
Box was not loose or moving,,this is something been on my to do list for a year
 

Attachments

  • IMG_2749.jpeg
    IMG_2749.jpeg
    325.8 KB · Views: 11
  • IMG_2747.jpeg
    IMG_2747.jpeg
    321.9 KB · Views: 11
Do you just use it when you need it and how soon do you feel relief once you turn it on. I always thought you set them up to stay on depending on how active you are. Anyway glad it’s working for you.

Carol had a herniated disc several years ago. She wore a TENS unit for almost a year that she would turn on when she needed it but was advised not to use it more than she needed.
Only run it when I need it and the strength I need. Lowest setting starts at the lower back. As strength is increased the "sensation" gets stronger and works further down the legs. It seems to have an automatic feature also. I can have it on mild setting and sit down in a firm chair and shortly it will increase down to or past the knees a for a bit and gradually return to where it was set. The incision area where they did the actual implant is really sensitive yet. After a 2+ hour charging session it really starts to get my attention when something is moved against it. Personally, they have a couple design changes they need to make. First they need about a 16 or 18" material piece added to the bag the charging pad is in so it will come part way around the side of the body. Takes two hand, and really need a second person to get it positioned right before the sleatic belt si stretched to thold things in place. Second, the charging pad is VERY sensitive to exact position in order to get the proper rate of charge. Almost impossible unless it is taped in place. Third, The cord between the recharging batter pack and the pad is to short at about 16". Needs to be at least 2 feet so it can be laid donw whiel the pad is positioned. The way it is set up now, due to limited shoulder movement to my back I cannot recharge the unit myself. Cannot get the pad close enough to the right precise place before it turn off. Will run about 5 days on a charge. Went that long the last time and took way too long to recharge the unit again so will do a recharge about every 3 days.

I had a tens unit a few years ago. Only wanted it used when limited activity. What is limited activity on an acreage in the summer with a garden? As a result, it was not compatible with my activity.
 
I found some rust on a box rib where it fastens to mount…of course the only way to fix this is remove the box…found a couple more areas on other ribs that need addressed
Box was not loose or moving,,this is something been on my to do list for a year
Your box is in very good condition.

Around here with the road salt, most boxes are really just shells with the inside floor holding things together.
Most are totally crusty rusty fragments.
 
Can't believe I let my kid talk me into this but I'm getting my old Dakota ready for a plow for this winter.... He asked and asked and asked some more, I kept resisting. But then he showed up with a 6-1/2' Fisher plow that he found on marketplace and spent his money on...
I don't drive this one much anymore, was looking at sending it down the road. The seller said it came off a Dakota, then the dad came and said it was on a Colorado. They never had it mounted on anything, but the sellers grandpa has 3 early model Dakota's on his property next door.
Given the mounts we got with it there's no way it could have been on a Dakota. .. I'm about done modifying them to fit, came in the house to eat while I let my welds cool and the smoke to clear out of the garage...
Having a 2 post lift of my own plus a chop saw and a big 220v Miller mig is invaluable for a job like this ....no, I'm not welding the plow mounts to the truck. All bolt on so I can take it off of I want....
Does the Dakota have the 5.2L? The 5.2L engine is trust worthy vs the later 3.7L and 4.7L engines.

For all the engineering, tooling, and life of the 3.7L & 4.7L engines, they should of never went that way. Why change from something that WORKED! Same goes for that very crappy 3.6L VVT. NEVER want one. Just when the 3.3L and 3.8L was at it's peak of tune performance and longevity, they brought in the crap engines. Don't get me going on the GM engines either. It's worse sadly.

Glad you were able to construct the mounting brackets and braces. Bet our son is happy to have a father like you! In the future he will reflect back on this event. He will learn to plow even better. And the credits go to you, his father! :) This is something no one can replace.
 
Yes it's the "5.2" (I'm American, and was born on cubic INCHES hahaha. ) That's a 318..... It's at 255k, still runs strong and doesn't use oil, but the body is shot and the frame is crusty... I haven't done anything besides tune ups, a couple of water pumps, and 1 set of intake gaskets on that engine. Bottom end is all original, never been into.

My other 2 vehicles are(unfortunately) both 4.7s which I was forced to get because they don't have any 318s or 360s anymore and I needed "help" from the bank when I bought them and I couldn't find any bank that would loan me a cent, to buy something old enough to have the engines I'd much rather have had. Those are paid for now, but I'm look at a different pickup out west (rust free) that's both a 3/4 ton and powered by a 360. With the 4.7, my current 1/2 ton is barely rated for some of what I tow, though that same 1/2 ton, if I could have found one with a hemi back when I was looking for a truck, would be rated over 2000lb more to tow.
But try finding any regular cab truck anymore with a true 8' bed. I refuse to buy a 4 doors truck with a 5 foot something bed. There isn't a more useless "truck"/ yet that's all that is available these days. Another reason I'm going "older".
And I'm noticing a huge difference towing with a coil sprung truck, and not in a good way. The airbags that a past owner put in help greatly. But still not as firm and "sure" feeling with a load on the ball with a leaf sprung truck.
I got what I could find with the 8' bed when I needed one.
 
Last weekend I worked on project white pole. Nope, this is not a pole cat story either. :D

Painted the kids fire pole from an old Rainbow swing and gym system we once had.
So the pole was free.
20241115_113033.jpg

Had an outside 20Ft extension cord for Christmas lights. And the light fixture was only $2 at a flea market.
The hardest part was feeding the cord into the pipe. It only got so far around the bend. So, I then took a long section of bale twine poly cord, and the shop-vac on the other side. Zip, done. Then tied it to the extension cord to pull it thru.

Had some free chain link clamps sitting around for almost 16 years. When would I ever use those. LOL
The end of the hook had a pass-thru hole, so I lynch pinned a 2-link chain segment and a lanyard to the light.
20241119_160811.jpg

Now for being out at 5am for chores isn't totally dark in the barnyard any more.
20241119_170701.jpg

Oh, whilst heading down my rural road, the new people who bought the home on the corner tossed this nice blue clean barrel to the curb. I mean, I just happen to pull up to the stop sign and snagged it. Guess they had used it for dry dog food. It didn't even smell inside. It now holds all of my 50-lbs chicken feed. About 10-gallon size too.
20241119_170932.jpg
 
I got the minibike back I sold a few weeks ago, I told them I would install the torque convertor after he learned how to ride.
I had bought an Amazon special, it has turned out to be a royal pain. The driver pulley appears not to be machine properly in the inside so it won't slide on the shaft. I also have to cut off a couple brackets and make engine blocks to lift the engine......and it's going to be a high of 35 the next 2 or 3 days.

I’d almost guarantee the engine is a metric shaft and the driver is standard. Everyone I’ve worked on has been this way. The cranks are either 16mm or 19mm. Just different enough from 5/8 and 3/4 that the machined fit doesn’t quite work. They are usually extremely tight. I crank swapped all of mine. 30 dollar crank shaft and 15 minutes was a lot easier. The blue engine in the picture came with a proper 3/4 crank.

The engine will need to come up at least 1”. I used 1x2 tubing so the engine had a nice stable base. I didn’t cut or modify anything else to do mine.

I know you are doing it on the MB165 or warrior or whatever name chassis (same design has been floating around for 25 years) but it’s basically the same procedure.

Another thing to watch for is the 4 bolt holes around the PTO shaft. Some are standard. Some are metric. I’ve had a mixed bag with these ones. I keep metric and standard bolts on hand for mounting these.

If you zoom in on the picture you can see the spacer blocks.

Not sure if you’ve ever installed one before but make sure the flat back of the driver is even with the flat back of the driven. You don’t want the pulleys centered on each other. Just like this. I haven’t saw a symmetrical tav since I was a kid, everything these days are asymmetrical.

You may already know all this. I love working on these little bikes way more than tractors! I’ve spent a ton of time screwing with these Coleman bikes because they used to be dirt cheap. I paid 250 bucks for the red bike brand new with free shipping from Walmart.

IMG_3941.jpeg


IMG_3847.jpeg
 
Yea Aaron, the shaft is a 16mm (196cc Lifan in a Coleman CT200U-EX). I am using a 5/8 to 3/4 adapter sleeve. I have the sleeve on the motor and the driver pulley slides halfway on, but as soon as it hits the internal key, it gets tight. I can see it's machined smaller than the non keyed part. I'm going to dremel it out and slide it on.
I also know about aligning backsides of the pulleys.
This bike has a bar in front of the rear wheel for the chain cover, it has to come off for the convertor plate, no getting around it.
I'm doing this for the kid I sold it too, not spending anymore money so crank swap is out for me.
 
Plan was to get rid of the old storm door yesterday. Top glass was frozen to the screen, both are good. Finally got the bottom one out but then the Ranger would not start. 19° so guess it didn't like it that cold. Gave up and came back in the house and cleaned the living room carpet while Carolyn was doing her shopping.
 
Pulled the plugs from the Liberty, no obvious signs of wetness or burning white. Scan says cylinder 1 misfire, but not sure which one it is. Going to see if my coworker has a compression tester or a coolant system pressure tester and go from there.
It was definitely burning white, missing badly, and coolant tank is bone dry.

You tube videos are showing 2 to 3 day job so with my luck, at least a couple weeks for me :confused:
 
Working on my Case 224 mowing deck.

So I’ve been wanting to change these mower deck spindle bearings for two years now. So I figured this would be a good winter project to do. Winter project meaning Jan / Feb or so. Any way, I figured I’d start at it now. I watched a video that Case Ingersoll Tractors Northeast did on changing these bearing, Thank You, and it was a great video. He said basically that they could be a bear to do, and maybe not so much. So I figured I’ll end up with the bear. That’s why I figured winter project. Any way, I only needed to do the centre spindle. I started at it the other day and within a few minutes had it all apart. I thought that’s great. I’ll find bearings and have it back together in no time. Hahahahaha. Ya. Just like every thing I do and go looking for parts. Seems there not easy to get. Odd size bearing. Anyway, I’ll continue looking. Must be some where in Canada ya can get them. And preferably in PEI.
Here’s a few pictures

Not a bad ramble. Have not had one in a while. Haha.


Noel
 

Attachments

  • IMG_9879.jpeg
    IMG_9879.jpeg
    364.4 KB · Views: 9
  • IMG_9880.jpeg
    IMG_9880.jpeg
    377.3 KB · Views: 10
  • IMG_9881.jpeg
    IMG_9881.jpeg
    258.9 KB · Views: 9
  • IMG_9882.jpeg
    IMG_9882.jpeg
    475 KB · Views: 8
  • IMG_9883.jpeg
    IMG_9883.jpeg
    367.6 KB · Views: 9
Working on my Case 224 mowing deck.

So I’ve been wanting to change these mower deck spindle bearings for two years now. So I figured this would be a good winter project to do. Winter project meaning Jan / Feb or so. Any way, I figured I’d start at it now. I watched a video that Case Ingersoll Tractors Northeast did on changing these bearing, Thank You, and it was a great video. He said basically that they could be a bear to do, and maybe not so much. So I figured I’ll end up with the bear. That’s why I figured winter project. Any way, I only needed to do the centre spindle. I started at it the other day and within a few minutes had it all apart. I thought that’s great. I’ll find bearings and have it back together in no time. Hahahahaha. Ya. Just like every thing I do and go looking for parts. Seems there not easy to get. Odd size bearing. Anyway, I’ll continue looking. Must be some where in Canada ya can get them. And preferably in PEI.
Here’s a few pictures

Not a bad ramble. Have not had one in a while. Haha.


Noel
Doing some them myself. Only on the Craftsman lt1000’s I pick up recently. Both decks were shot. One had the spindle busted and the other I’m just putting bearing in.
 

Attachments

  • IMG_1029.jpeg
    IMG_1029.jpeg
    518 KB · Views: 7
  • IMG_1030.jpeg
    IMG_1030.jpeg
    576.3 KB · Views: 6
  • IMG_1031.jpeg
    IMG_1031.jpeg
    509.3 KB · Views: 5
  • IMG_1032.jpeg
    IMG_1032.jpeg
    481.8 KB · Views: 7
Back
Top