What are you currently working on??

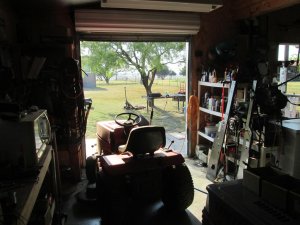
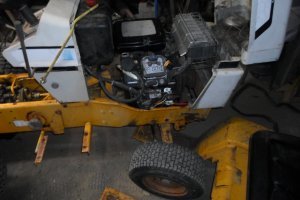
Was back on the CC1650 today. Motor is in and anchored down. Drive line lined up good. Can remover the engine by removing 2 nuts & 2 bolts and two out of the rive shaft. Today I did the wiring. Engine had key start so only had to remove all the old wiring and lengthen the key switch wiring to get it going. First two photos are of the engine to PTO adapter I had built. Round end goes against the flywheel, nut inside the tube.

SAM_1191.JPG SAM_1192.JPG

Welding in the back motor mounts from underneath. Not my favorite way to weld.

SAM_1193.JPG SAM_1194.JPG


Old wiring removed and new inside the split tubing and tied up snug and out of the way. Throttle and choke cables replaced.


SAM_1204.JPG SAM_1205.JPG SAM_1206.JPG

SAM_1208.JPG

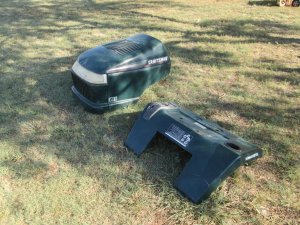
Put the nose on and then the hood. Nose cleared the oil filter by 1/4" so won't have to move it. Rag joints are nearly straight or square so very little difference between the end of the crank shaft and the input of the hydro. Fuel tank is a temp hook up just to get it running. Went for a drive down the road a ways and back. Hydro worked great, nice control and good slow speed control forward and reverse. Needs a few things yet like hydro fluid changed out and new filter, hydro fan installed, fuel tank mounted on the rear of the tractor and probably wouldn't hurt to throw some paint at it. Amp gauge and PTO switch need hooked up. All in all I feel the engine swap was a big success. Will get more photos after the fuel tank is mounted and it is up and running completely. Be glad to answer any questions you might have.
 

Attachments

  • SAM_1207.JPG
    SAM_1207.JPG
    115.9 KB · Views: 5
Last edited:
Today was a tire day here….. Most went well, had to plug a couple of the 12” tires after pulling thorns out. And then there was the 8” that the bead just wouldn’t seat. I brought it to almost 50 psi. I felt really uncomfortable. I broke the bead again and soaked it really well with soapy water, still no luck. I was thinking it would be nice to have a long (say 10') air chuck that clips to the valve stem, the one I have is only around 12". Then I thought, hay the air compressor has a regulator. So, I went into the shop and set the regulator to below 40 psi and taped the air chuck open. Went back into the shop and felt I was a safe distance and cranked the regulator up slowly. Right around 75 psi it sounded like a 22 cal. Rifle shot and soap water shot a bought 8’ into the air. Not sure why it was so hard. Tires are done, aired to 18psi and will check again in a couple days. More parts painted. Waiting on the new parts to arrive so I can start assembly (if I remember how this goes back together). Any guesses to a paint that matches the tins?
 

Attachments

  • 1.jpg
    1.jpg
    89.8 KB · Views: 4
  • 2.jpg
    2.jpg
    136.5 KB · Views: 4
  • 3.jpg
    3.jpg
    111.9 KB · Views: 4
  • 4.jpg
    4.jpg
    92.9 KB · Views: 6
  • 5.jpg
    5.jpg
    97.7 KB · Views: 4
  • 6.jpg
    6.jpg
    94.8 KB · Views: 4
  • 11.jpg
    11.jpg
    70.2 KB · Views: 4
  • 12.jpg
    12.jpg
    120.4 KB · Views: 6
  • 13.jpg
    13.jpg
    199.9 KB · Views: 6
I use regular gun grease around the bead & rim area to seat those stubborn ones. Never had much luck with soap & water.
 
I have an 04 Avalanche, which is probably real close to the same set up as your GMC. I had that same "Tighten Gas Cap" message a few times. Put on a new gas cap and still got the message. The it quit. Then once in a while the check engine would come on. Had a GM mechanic friend that has a big code reader check it once. Some where (they put them various places) is a filter for fresh air intake to part of the emission system. This filter starts to get full of road dust, etc. and causes the code. He did a quick look but did not see it. I kept clearing it and haven't see it now for some time. I did have to put a new fuel pump in about a month ago as the metal fitting out the top of the plastic pump had rusted through & was leaking gas. Mechanic said that could have been causing the "check engine" light to come on. Hopefully that is not your situation as that was not a cheap repair.

Thanks for the heads up on that Roger! I searched the gas caps and saw that filter was recommended along with them. We have about 133,000 on the old truck now and that is about the fuel pump lifespan. Should happen at any time I suppose. I will be doing the replacement so it may not be as costly. The check engine light stayed off while my wife was running around in town today so maybe we will get by for awhile yet.

Had a bit more to do today than anticipated but everything worked out. I decided to pull the sump pump and roll up the 250' of 1-1/2" hose that was keeping the well pit pumped down. It is still raining off and on but not every day at least. Noticed a pretty fast leak coming from the bottom of the well pressure tank which I can't directly see. Had to empty the tank so I could pull it out and look at the bottom. Thankfully the tank wasn't rusted out and all it needed was fittings tightened up! Put the tank back in it's place and pressured it back up. No more leaks. Finished rolling up the hoses and stashing them in the shed along with the pump and by that time it was a late lunch, get the MF12G ready and start mowing after 2 weeks of neglect since we had gone to Denver.

DAC
 
First sign my fuel pump was leaking was the smell of gas right by the left rear door, right ahead of the fuel pump. Will start dripping down the front of the tank. <ine had around 220K when it went out.
 
Working on the last little detail of the Briggs install in the CC1650. The exhaust would be shooting right against the bottom side of the hood. I needed a 4" extension on the muffler and a notch cut out of the side of the hood. I needed a 1-1/8" ID piece of tubing to slide over the muffler. closest I could come up with was 1-1/4" ID. Cut a 4" piece off the third leg of an old steel ironing board in my scrap pile. Clamped it in the vise just snug enough to hold it and split it with a cut off wheel in the angle grinder. Squeeze it closed and split again - 4 times. Squeezed it back round, in the vise and held closed and tacked it in about 6 places with the wire welder. 3 1"+ cut in the end, slide it over the exhaust with a hose clamp and clamped it down tight. Closed the hood till it contacted the exhaust extension and marked a half circle on the hood. 2 cuts with a big tin snips and some bending removed the bulk of it. Finished it with the die grinder. Turned out good in my opinion. Tomorrow I mount the fuel tank on the back, run the fuel line up to the engine and will have a running CC1650 with a smooth running Briggs Vanguard twin to power the snow thrower this winter.
SAM_1209.JPG SAM_1210.JPG

If the hood gets to hot as the muffler is right in the front top of the hood, will remove the headlights and put screen wire in their place. This will allow the engine fan to blow the heat right out the front of the hood as weel as the whole open lower area of the grill.
 
Well now that I have all the wood in for the winter. I got to fixin up the wood stove and flue pipe. Some repairs needed. Can’t afford a new stove. Stainless single wall pipe off the stove rusted out. But I would say it was really the heat that did it. Have to replace two feet of pipe and the tee that was on the stove. Use the bottom of the tee for a clean out at the stove. Up and running again soon. Ordered new stainless tee today.

Noel
 
When it cools down and stays cool enough to work with a chain saw I have 25 poplar trees that are dead or near dead that need to come down. Need no wind or North wind as they right between the Co. road and the power line. Run from8" to around 18" diameter. Plan to drop them on the road then drag then to the drive and work them up there. Be a lot of small branch junk on them for sure. Chipper time.
 
Actually yesterday, but the paint is dry this morning. Since the other two tractors I have 3-point hitches on have space for 4 of my suitcase weights, I made up a new bracket for Alice so she wouldn't be jealous. LOL. I made it so the weights would be 1/2" lower so the hood will open a bit further with them on there.
DSCN4760.JPG DSCN4761.JPG
 
Today's project is finish painting some parts on the 2-bottom plow I built some time back. the braces and the front section of the second plow were gathering rust.
DSCN4762.JPG

Got the parts off and wire wheeled. Put a coat of self-etching primer on things.
DSCN4763.JPG

Got the semi-gloss black on (2 coats).
DSCN4764.JPG

They are out under the sun to cure out overnight! I'll put things back together tomorrow morning.
 
Mounted the fuel tank on the back of the tractor this morning. Run the fuel line inside the frame, put the filter in line and connected to the carb. Pick up the tank bushing and new valve in the morning. Bolted the foot rest to the supports with new bolts. Just about a finished project.
 
Plow parts were dry this morning, got that all back together. I found a pair of Brinly oval decals on E-Bay for $6 + free shipping. Should be here in a couple days.
DSCN4765.JPG
 
re: Brinley decals. Contact Brinley and they will send you decals if your "restoring" Brinley equipment. I got them for my plows and they sent some others of their newer design, no charge. Old original design are NLA. I would guess they would still do this as they did for me a couple years ago.
 
Got home from work with a little bit of ambition for once! Did some more work on that 40 dollar snowblower I bought last July. Got it starting without ether now, choke wasn't closing when pulling the "start" knob. Then I installed a kill switch. Fired up the antique Windows 98 computer and cut stickers for the toggle switch. got that stuff put on, then I turned a coarse thread lever into fine thread for the transmission shifter. I only had a 3/8" fine knob laying around here. I think this thing is going to work out ok! Oh then since it hasn't rained for awhile I watered the 6 young pine trees for about 10 minutes each.

DAC

switch stickers.JPGswitch and knob.JPG
 
No mechanic work, had to remove backsplash tile for my clients on weds so counters could go in an hung two chandeliers. Spent the day yesterday at my aunt's replacing trim around a sliding door and windows. Framing is so off, every piece of trim is custom cut and fit. 5 hours and not even half done.

I really need some tractor work on the purple Sears, but probably not have time this weekend although I dream old having to strip the crackle fender and repaint.
 
Mowed with the CC1512 yesterday for about 2 hours. Run like a dream till i moved to that last area. I don't like to turn the electric PTO on when at or near full throttle so I bring it down to fast idle, turn the PTO on and when I throttle back up - it only goes about half way. Core moves both ways so it is not broke. Think the housing came loose at the control itself. Will get it in the shop this morning and check it out. Nasty to get to as I replaced that whole control (dual cable) about 2 years ago.
 
Back
Top