MF 1450

Great to have stuff around to use instead of buying Doug. That’ll work great. Bet those disks are chinese made now. And with your set up in there, what is the inside measurement on the lower arms. And while I’m at it, how long are the arms from the pivot point at the axle out to the end of the arms. Plus where the top arm lifts the lower arm how far in from the outer end. Thanks Doug. When ever you get a chance, no rush.
Noel
 
Last edited:
Great to have stuff around to use instead of buying Doug. That’ll work great. Bet those disks are chinese made now. And with your set up in there, what is the inside measurement on the lower arms. And while I’m at it, how long are the arms from the pivot point at the axle out to the end of the arms. Plus where the top arm lifts the lower arm how far in from the outer end. Thanks Doug. When ever you get a chance, no rush.
Noel
Hey, Noel, if my lousy welding holds up, it should work---LOL! I can see better now using the readers, but having to weld any length I shake so damm bad I still lose where I going and have a hard time controlling how fast I'm moving. It's supposed to be a side effect of the 3 asthma inhalers I was on up until 2 weeks ago. Pulmonologist put me on a different one that cuts it down to two, but sure never felt any relief from the shakes tonight.

I built that lower mount right to the specs on the drawings Kenny sent. 18-1/2" inside the ball swivels. Arms look like they are positioned well like that.
DSCN3679.JPG

Arm length from center pivot on the transaxle to center pivot of the "T" frame looks about 18-1/2 also. I could be a little off from a good eyeball on the axle pivot end though.
DSCN3680.JPG

Not sure if this is what you mean on the other dimension. This is the pivot where the cylinder mounts to the lift arm. Guess you need to read the tape on that one!
DSCN3678.JPG

I'm not looking forward to boxing in that channel! I'm sure I can weld it and I do have grinders I guess---LOL! Should have flipped it over so ugliness is facing the dirt at least, but that wouldn't hide the rest of it---LOL!
DSCN3677.JPG

DAC
 
Where the upper arm goes down and connects to the lower arm. To lift the lower arm. How long is that from the outer end of the lower arm into where it’s lifted. Don’t if I explained that any better. Hehe. The picture may give better idea. The length of the yellow mark I put.

Noel
 

Attachments

  • 148AB9C6-629D-420E-ADC3-5175738CCC17.jpeg
    148AB9C6-629D-420E-ADC3-5175738CCC17.jpeg
    763.3 KB · Views: 6
Are you always on those puffers, I call them, Doug, or just when you need them. Luckily I don’t use them, but my daughter does. She only needs them at certain times. And says they give her the shakes.

Noel
 
Where the upper arm goes down and connects to the lower arm. To lift the lower arm. How long is that from the outer end of the lower arm into where it’s lifted. Don’t if I explained that any better. Hehe. The picture may give better idea. The length of the yellow mark I put.

Noel
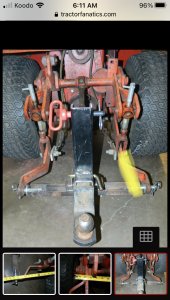
Ok, I understand now, Noel! I get 8" from center to center of those 2 holes. Of course that is measured at an angle due to the dogleg in the bar.

Are you always on those puffers, I call them, Doug, or just when you need them. Luckily I don’t use them, but my daughter does. She only needs them at certain times. And says they give her the shakes.

Noel
Yeah, since a bad asthma attack on Christmas 2017. Took a month to get into a pulmonologist. She put me on two twice daily "preventative" puffers, plus the rescue one that I had been using way too much I found out. I carry that one all the time. two weeks ago at my semi annual appointment, we talked about something different. I'm trying a once daily preventative one now. It was more about trying to save some money rather than the side effects. So far I think it is doing the job. Some of these daily ones are a powder rather than an aerosol spray. One we dropped was and the new one is also.

I'm sorry for your daughter having to use them, Noel, but it is nice to know that others experience similar side effects. Hers sounds like a rescue inhaler, which she would use when she feels breathing problems coming on. Just seems to be something you have to put up with to stay alive and active.

I did get some plates built and tacked on to the "T" frame tonight. Think I will just weld it with a series of tack welds rather than a long weld.

DAC
 
We didn't have to go to the inlaws as my wife worked with a person who came down with covid a few days ago and just found out yesterday. Just for safety's sake we decided that the old folks didn't need us there in case of us carrying it.

T frame is painted, installed and working! Might need some fine tuning though. I went to fire up the tractor and a pretty big fuel leak right at the shutoff on the MF12G tank. Hose clamp I used was a little too big so I tried to tighten it more than it could do when I first installed it. The inner part of the worm gear band had sliced the fuel line under it. Dug around, found a smaller used one and that worked. Then I cranked it and it acted like no fuel, and there wasn't much in the clear filter. Squirted a little ether in the carb and it fired off. Was sure hoping that the fuel pump didn't quit already since it was so cheap. I unhooked the line at the fuel filter to tank end held it straight up with gas in it, and the tractor fired right up and the fuel in the filter sucked right down. Took the filter off and put a piece of tubing in it's place. Looked like the filter caused an air lock. Fired right up and ran well after that! Amp gauge doesn't work, but I think it's charging as after running it for a little over a half hour the battery voltage was still 12.5 volts, about where it was before running it. Needle doesn't even wiggle working the switch.

DSCN3686.JPG DSCN3688.JPG

Went in the back yard and gave it the test.
IMG_0562.JPG IMG_0564.JPG

Pulled the trailer out 20 feet or so then backed it into place again. It worked good and was able to go slow enough in reverse that I didn't get it all crossed up. My neck is pretty bad and backing without mirrors can be kind of painful.

Looks like if I slotted the tubing more, and drilled more holes I could get it to stay a bit more "plumb" going through up and down travel. If the upper link can stay parallel with the lower arms it should lift pretty square. Still going to build an adjustable upper link, but not right now. The position right now would be good "tilt" if I ever get pallet forks built. I haven't tried to bring the screw adjusters up more yet.
DSCN3689.JPG

I'll probably go buy a couple more of these at HF. They are cheap at around 11-12 bucks and attachments can be welded to them. One just like it is will probably be good too!
DSCN3690.JPG

DAC
 
Jumpins that’s great Doug. Yea for you.
Hope the covid thing doesn’t affect you two.
Few schools closed here because of some cases. It doesn’t seem like it’s going to quit.

Noel
 
Thanks, Noel! One chore it is ready to do!

We did get the shots, but not sure I trust anything that's going on with all this covid stuff. We decided we aren't going to live in fear about it. Our daughter is the opposite. She's terrified of it and hating on folks that choose not to get the shots.

DAC
 
Hey Doug, Heavy Hitch makes a Brinly hitch adapter for receiver hitches, I have one for my 318/420. They are pretty well built.
For Brinly implements, Jake? I'm still being cheap and setting it up using junk I have.

DAC
 
Doug, you want to be 12" from your lower pins to your top link pin center to center. You can adjust your lower arms up or down as well.
Thank-you Jason! Those adjusters are free so will give it a shot. Could you measure center to center hole dimensions of a stock top link? maybe about center of the adjustment? That would be helpful also.

I just went and measured---right at 12", center to center. Weird thing is, I screwed up the right way somehow. That is rare---LOL! The pdf drawings I got from Kenny wanted 13-1/4" center to center. Thought sure that's what I did but got lucky some how!

DAC
I had not noticed that dimension before. Why it's that way, I don't know.
 
I had not noticed that dimension before. Why it's that way, I don't know.
No big deal, Kenny! Not blaming you for anything! Maybe there's other tractors out there that use that dimension! Just good that even if it would have been the long measurement, I still could have cut it down and drilled it! I appreciate all the help you give, and those drawings were still a valuable starting point!

DAC
 
The latches I ordered for the hood hold down came in today, and yesterday, when we were at Ace Hardware, I picked up some of those felts similar to what Rick recommended.

Had enough ambition to install a latch and some felts after work tonight. I have to push the hood down a buit to turn the latch and it feels real solid. Should control the shaking of the hood well.

DAC

DSCN3693.JPG DSCN3694.JPG DSCN3695.JPG
 
Back
Top