You are using an out of date browser. It may not display this or other websites correctly.
You should upgrade or use an alternative browser.
You should upgrade or use an alternative browser.
The Build to "Beware of Husqvarna Garden Tractors!"
- Thread starter GT48DXLS
- Start date
Without power steering the front lug tires will be harder to make turns with the bucket full or empty.
Mike
I thought the same thing, however, the turf tires are so slick on beach sand that the lugs have been perfect. I only own 2 dump truck loads of dirt as of 2:00 P EST today, Dirt comes at a premium here at $220 a truck load!
I would have been good with a tire that I see on real tractors with the (for lack of knowledge or a better term) tires that have a keel in the middle all the way around to be able to track well. The next best thing I could find for my size was the lugs, they have helped transform the performance of this machine (at least on sand).
Not that I wouldn't mind power steering and the added benefit of being able to tap into the hydraulic line for an oil cooler and remote filter
")
I think if I had land with dirt I would have gone with turf tires that were 4 ply for the very reason's you bring up. What may not have transferred over from the first thread (part 1, "Beware of Husqvarna Garden Tractors!") I live approximately 1.5 hrs north of Tampa, and close enough to the Gulf of Mexico that I can smell the beach. It's all sand, and Gulf sand (fine). There are some different challenges here for sure that 20 minutes east of me won't have because they have dirt.
Very detailed progress
I use the ratchet to seat the tires. Wow, can they jump when the tire is filled and releasing the strap. Sliced a finger a few times. Yup, I am a hard learner, takes a few lessons to sink in.

Nice progress.
How does that larger battery work on your Ryobi? I have the std batteries, they don't seem to last super long in my grinder or circular saw.
Worth every penny and thank you.
I tend to try and see what they will do just to know. For an example, the 15ga finish nailer with the small battery put down approx 70 nails, not terrible, what was, is the lack of power after about 40 nails, they would fail to go all the way in. I put that in the it-can-be-done-in-a-pinch-if-that's-all-you-got. The 4Ah put down 280+ nails before it started to fail.
I don't have the saw or grinder yet so I can't give you apples to apples comparison but,
The little handheld flashlight that is 180 lumen (I think), the small battery lasted 10 straight hours, the 4Ah lasted over 24 straight hours. I can't be specific because I lost track of the time so I have to do it again, but I did check after 24 hrs so I have that.
Where I noticed the difference in power was with the hammer drill (my first purchase) the regular batteries were ok but I was changing them frequently while working outside. I made the buy on the 4Ah and I was using it all day with out changing batteries. I know that is very subjective, but you have me curious now, I may try an idea with the drill all out on high with no load and see how long it lasts. I have been happy with the tools but I've only had them a year and that may not be long enough to really know how well they will hold up, yet.
How long have you been using your Ryobi? how well does that saw work?
02SEP2018,
Time to install the wiring and switches for the Johnny Bucket.
The switches,

I went to West Marine to get Marine Grade wiring, shrink wrap, terminals, fuse box, and bus bar, all stainless steel, The reason for stainless steel when possible is because the salt air corrodes very quickly. The Thompson Warner actuators are rated at a max draw with max load at 25 amps on 12 volts, that's a lot of heat, I figured this would not be the time to go cheap on wiring, and the connectors are soldered.
This is the new positive battery cable,


The new Negative battery cable,

The Fuse box,

This is the bracket, switches wired and neg bus bar. The bracket is 2" aluminum flat bar from the box store and 1/8".


The main cable from the switches to the bucket are in a coil, I already fit it to the aluminum bracket that I made and I didn't like how loose the main part was, so it was disconnected from the bracket until I made some new brackets. I'll finish showing the new brackets when I find or take new pictures.

Time to install the wiring and switches for the Johnny Bucket.
The switches,
I went to West Marine to get Marine Grade wiring, shrink wrap, terminals, fuse box, and bus bar, all stainless steel, The reason for stainless steel when possible is because the salt air corrodes very quickly. The Thompson Warner actuators are rated at a max draw with max load at 25 amps on 12 volts, that's a lot of heat, I figured this would not be the time to go cheap on wiring, and the connectors are soldered.
This is the new positive battery cable,
The new Negative battery cable,
The Fuse box,
This is the bracket, switches wired and neg bus bar. The bracket is 2" aluminum flat bar from the box store and 1/8".
The main cable from the switches to the bucket are in a coil, I already fit it to the aluminum bracket that I made and I didn't like how loose the main part was, so it was disconnected from the bracket until I made some new brackets. I'll finish showing the new brackets when I find or take new pictures.
02SEP2018,
I busted my knuckles, elbows, hands, face even on the dual springs that return the deck. I'm sure there is some super-special-secret way to install these simply, but it escaped me. So just shy of jumping up and down, barking at the moon, flapping chicken wings, I had an idea. The theatrics I figured would keep this civil and family friendly, but these things were a pain.
My last efforts before calling for help, was to use a cargo strap. Wish I knew to start with this first.

Also as a side note, do you see the fuel tank (looking up) just resting in there between the body and trans, nothing there to ensure it doesn't move, relying on the filler neck through the body hole and a loose track underneath. I prefer bolts and straps, something.

I was very concerned about the tension on the body at first, kept checking with fingers while slowly ratcheting, but it was fine.
I busted my knuckles, elbows, hands, face even on the dual springs that return the deck. I'm sure there is some super-special-secret way to install these simply, but it escaped me. So just shy of jumping up and down, barking at the moon, flapping chicken wings, I had an idea. The theatrics I figured would keep this civil and family friendly, but these things were a pain.
My last efforts before calling for help, was to use a cargo strap. Wish I knew to start with this first.
Also as a side note, do you see the fuel tank (looking up) just resting in there between the body and trans, nothing there to ensure it doesn't move, relying on the filler neck through the body hole and a loose track underneath. I prefer bolts and straps, something.
I was very concerned about the tension on the body at first, kept checking with fingers while slowly ratcheting, but it was fine.
I was looking through my email and remembered I had intended to post the 3 documents that came from here;
Tuff Torq Corporation
After Market Service Parts
6041 Hunter Road
Talbott, TN 37877
Phone (866) 572-3441
Fax (423) 317-2312
The response they sent me to questions I had, that on a hunch, thought Husqvarna was lying about in their response to me (in the "Beware of Husqvarna Garden Tractors!" which was part one of this, I believe on the 3rd page?), and they were.
This is Tuff Torq's oil change guide for K62 and K66,if anyone out there are or were told they are maintenance free transaxles they are being mislead, and they are not giving you (the customer) good customer service.
The second attachment is the parts diagram for the K66AG transaxle, there are some differences between K66.
The third attachment is for the parts list (K66AG).
Again, If someone is wondering if this is real, I gave the source above and can prove time and date. I hope this helps.
Attachments
The k46 is "maintenance free" until the oil breaks down and the unit doesnt work anymore. But by then it's usually too late to save it.
The k58 john deere uses in there upper end x300 line is recommended 50 hours first change then 200 hours after that. Same for the k72. I plan on changing mine in my k72 at the beginning of every grass cutting season.
Service that thing and it will last a long time!
The k58 john deere uses in there upper end x300 line is recommended 50 hours first change then 200 hours after that. Same for the k72. I plan on changing mine in my k72 at the beginning of every grass cutting season.
Service that thing and it will last a long time!
The k46 is "maintenance free" until the oil breaks down and the unit doesnt work anymore. But by then it's usually too late to save it.
The k58 john deere uses in there upper end x300 line is recommended 50 hours first change then 200 hours after that. Same for the k72. I plan on changing mine in my k72 at the beginning of every grass cutting season.
Service that thing and it will last a long time!
I agree, Ever here of the Volvo V70 2001,2002,2003 transmission problem? Yep, auto manufacturers try to pull this off too, they told customers that the oil never needs changing (it's an Aisin, Toyota trans). funny how they fail at around 70,000 + miles unless customers rebelled and changed the oil on common sense.
Though on the other, I tried to just stick with the Tuff Torq's that I have facts on (because it is direct contradiction to Husqvarna and others), but you are right.
Worth every penny and thank you.
I tend to try and see what they will do just to know. For an example, the 15ga finish nailer with the small battery put down approx 70 nails, not terrible, what was, is the lack of power after about 40 nails, they would fail to go all the way in. I put that in the it-can-be-done-in-a-pinch-if-that's-all-you-got. The 4Ah put down 280+ nails before it started to fail.
I don't have the saw or grinder yet so I can't give you apples to apples comparison but,
The little handheld flashlight that is 180 lumen (I think), the small battery lasted 10 straight hours, the 4Ah lasted over 24 straight hours. I can't be specific because I lost track of the time so I have to do it again, but I did check after 24 hrs so I have that.
Where I noticed the difference in power was with the hammer drill (my first purchase) the regular batteries were ok but I was changing them frequently while working outside. I made the buy on the 4Ah and I was using it all day with out changing batteries. I know that is very subjective, but you have me curious now, I may try an idea with the drill all out on high with no load and see how long it lasts. I have been happy with the tools but I've only had them a year and that may not be long enough to really know how well they will hold up, yet.
How long have you been using your Ryobi? how well does that saw work?
Drill won’t stay running for more than 10 minutes. Some sort of thing to kick it out of gear. Teacher also yells at you.
Don’t ask me how I know

Worth every penny and thank you.
I tend to try and see what they will do just to know. For an example, the 15ga finish nailer with the small battery put down approx 70 nails, not terrible, what was, is the lack of power after about 40 nails, they would fail to go all the way in. I put that in the it-can-be-done-in-a-pinch-if-that's-all-you-got. The 4Ah put down 280+ nails before it started to fail.
I don't have the saw or grinder yet so I can't give you apples to apples comparison but,
The little handheld flashlight that is 180 lumen (I think), the small battery lasted 10 straight hours, the 4Ah lasted over 24 straight hours. I can't be specific because I lost track of the time so I have to do it again, but I did check after 24 hrs so I have that.
Where I noticed the difference in power was with the hammer drill (my first purchase) the regular batteries were ok but I was changing them frequently while working outside. I made the buy on the 4Ah and I was using it all day with out changing batteries. I know that is very subjective, but you have me curious now, I may try an idea with the drill all out on high with no load and see how long it lasts. I have been happy with the tools but I've only had them a year and that may not be long enough to really know how well they will hold up, yet.
How long have you been using your Ryobi? how well does that saw work?
I got the kit for Christmas 3 yrs ago, maybe 4. I'm not sure if it's the batteries or the saw, but the saw quits running if it gets any type of bind on it. I notice my angle grinder and sawzall will do the same sp probably battery. We have a tool outlet store, I can get one of those larger batteries for reasonable so may try it.
I got the kit for Christmas 3 yrs ago, maybe 4. I'm not sure if it's the batteries or the saw, but the saw quits running if it gets any type of bind on it. I notice my angle grinder and sawzall will do the same sp probably battery. We have a tool outlet store, I can get one of those larger batteries for reasonable so may try it.
I have three batteries;
P102-18V DC, 1.3Ah= 24Wh (original)
P107-18V DC, 1.5Ah= 28Wh (also +1)
P108-18V DC, 4Ah=72Wh (also +1)
I bought the P107 when I was trying to get some practical use out of the 15 ga finish nailer and dual inflator, there was a noticable difference between the P102 and P107.
Everything was good until I bought the 10" chainsaw. It would blow through the 1.5 Ah too quickly to be of practical use for me and I stepped up to that P108, the tool came to life, and the nailer, now it gives me enough time on both to be practical.
As a note;
The chainsaw is adequate for rough pruning , supplementing my real saw or maybe a camp saw?, Not real practical for felling trees (just my humble opinion), an average 10" tree limp pole saw attachment for a 1 hp gas weed eater is the equivalent to approximately 746 watts DC (watts being worked performed). My little saw with an P108 is 18vdc x 4 Ah = 72 watts! Almost 10%, it's just a quiet convenience.
I say all that to qualify this, I think your circular saw might come to life with the bigger battery because it has a larger power draw than the smaller tools. Let me know if there is a noticeable difference, I'm curious.
I want to say for the rest of the group following, I'm not endorsing the Ryobi. I don't have a problem with recommending a tool when it impresses me, but I'm still skeptical with this product, some of the tools are very practical out on the property, but I don't feel I have sufficient time with them to know if they will truly hold up.
I've never owned a ryobi product. I've had a lot of tools though. Best bang for your dollar is the craftsman 19.2 c3 stuff. I've had excellent luck with them.
Update,
10SEP2018,
As I started to hook the fuel lines back up, I was uncomfortable with how close moving parts were to the rubber line running inside the chassis next to the brake rod and spring where they connect to the brake arm on the transaxle. The brake rod and spring are intentionally loose but not too loose (perfectly tight risks having the brake engaged all the time, too loose and the brake won't engage). The brake rod moves enough that if there was a sudden rocking side to side the two will touch. This is a sloppy design, I tried to clean it up a bit. Just to be clear for those of you used to seeing solid fuel lines on well built machinery, (Not a Husqvarna GT) all the lines on this were rubber, loose, and floppy.
I bought a 50' coil of 1/4" steel brake line with chassis fasteners, and nuts as a kit on Amazon for $25.
Here is what I came up with to solve this; (the lines do have a mild flare on each end with a double flare tool, just enough to offer a tight seal)
Because I didn't see a need to change the lines from the carburetor back to the fuel pump, I started at the back of the motor with the first aluminum bracket I made out of flat bar, and a shop vice.


I had many test fittings on and off with the new peices as I worked my way back, and put the sharpie black arrow on the fuel filter just to make sure I couldn't miss the proper direction. Also with this section I solved the problem with the filter rubbing on the back of the motor with vibration, (How it came from the dealer).

This next step was tricky, I blew through many pieces of tube before settling on this to get around the frame in a way that would not be to vulnerable to things while operating.

Then under the body going back to the fuel tank.


Then getting the angle right to still allow for vibration safety at the tank but also to avoid all the potential moving hazards of raising or lowering the mower deck.


A view from the rear.

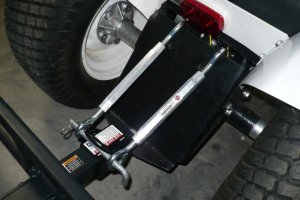
10SEP2018,
As I started to hook the fuel lines back up, I was uncomfortable with how close moving parts were to the rubber line running inside the chassis next to the brake rod and spring where they connect to the brake arm on the transaxle. The brake rod and spring are intentionally loose but not too loose (perfectly tight risks having the brake engaged all the time, too loose and the brake won't engage). The brake rod moves enough that if there was a sudden rocking side to side the two will touch. This is a sloppy design, I tried to clean it up a bit. Just to be clear for those of you used to seeing solid fuel lines on well built machinery, (Not a Husqvarna GT) all the lines on this were rubber, loose, and floppy.
I bought a 50' coil of 1/4" steel brake line with chassis fasteners, and nuts as a kit on Amazon for $25.
Here is what I came up with to solve this; (the lines do have a mild flare on each end with a double flare tool, just enough to offer a tight seal)
Because I didn't see a need to change the lines from the carburetor back to the fuel pump, I started at the back of the motor with the first aluminum bracket I made out of flat bar, and a shop vice.
I had many test fittings on and off with the new peices as I worked my way back, and put the sharpie black arrow on the fuel filter just to make sure I couldn't miss the proper direction. Also with this section I solved the problem with the filter rubbing on the back of the motor with vibration, (How it came from the dealer).
This next step was tricky, I blew through many pieces of tube before settling on this to get around the frame in a way that would not be to vulnerable to things while operating.
Then under the body going back to the fuel tank.
Then getting the angle right to still allow for vibration safety at the tank but also to avoid all the potential moving hazards of raising or lowering the mower deck.
A view from the rear.
I've never owned a ryobi product. I've had a lot of tools though. Best bang for your dollar is the craftsman 19.2 c3 stuff. I've had excellent luck with them.
I have a nearly 2o year old Craftsman corded drill that was cheap (in retrospect), been dropped, kicked, crushed, survived rain, and in other words truly used. Very tough drill
I had to retire my old yard trailer ($100 box store special) and picked up an Ohio steel 12 cubic foot dump cart (4048P-HYB) to complete my project for now. I also picked up a universal ATV receiver that I mounted on the rear sleeve. I also found a 2" universal ATV hitch that I mounted upside down in order to clear the suit case weights and a ball mount with 4" drop that I oriented with a rise to get the 12" for flat connection with trailer.


The new trailer had plans for the wood side extensions included in the manual. I altered the plans a little by adding a third horizontal with treated 1"x4" I already had. The virticle boards are 1"x3" and I oil coated them (50% diesel and 50% 30w dino oil brushed on like with fences).


The old trailer and new,


The new trailer had plans for the wood side extensions included in the manual. I altered the plans a little by adding a third horizontal with treated 1"x4" I already had. The virticle boards are 1"x3" and I oil coated them (50% diesel and 50% 30w dino oil brushed on like with fences).
The old trailer and new,