What are you currently working on??

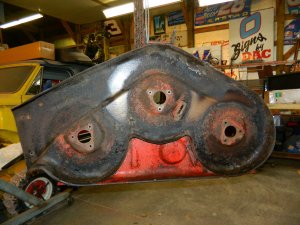
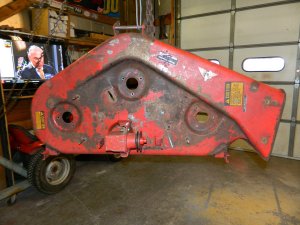
I found that closing that gap will definitely help in dry snow. Probably the reason Mfg. are not doing it i cost. They want to make them as cheap as possible to sell and not real concerned about performance. If you have a JD your not going to make a better performing CC thrower work on it as an example.

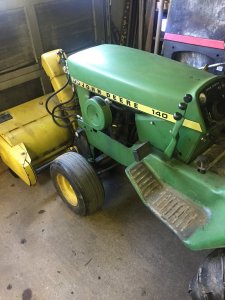
As long as your engine is strong enough to run a thrower, speeding up the thrower a bit shouldn't make any difference. Mine was on a diesel which performs a lot different than a gas engine. Just don't get casrried away on changing the thrower speed.
 
Success with the new starter. Started about 10 am and was done and had it running again about 2 pm. One of the nastiest jobs I ever got in to. Mostly because of that one bottom starter bolt. Getting it started was a feat in itself. Had to keep pressure on the head of the bolt while trying to turn it 1/2 flat at a time. Not much room down in to hardly see the bolt let alone turn it. Tri-focals don't help any either. Ever try to turn in a bolt with a wrench when your seeing two bolts and not sure which one to turn ? Probably when they want you to dismantle the whole drive system to get at that one bolt. Rant over and by golly I WON !!:thumbs:
 
It's a Polaris Ranger engine Larry, don't know specifics about them. I did the same thing at work a couple of months ago. It probably took me another hour longer than Roger since I re-used the too-long bolt he was talking about. With both of my fat hands in that small space, putting the pressure on the bolt and the other turning the wrench I couldn't see the stupid bolt at all so eyesight wasn't a concern. Did it by feel until I was sure the threads had started! Hope to heck that I am retired before the starter goes out in the other Ranger at work!

DAC
I removed the air intake tube between the carb and air intake box which gave a lot more room on that side. (Duct tape over the carb intake) Have heard of some that remove the carb too but that is another 45 min +. I used a long flat screwdriver wedged between the belt cover and the bolt head. Thought I had it 3 times before I actually did. If one could get at the ends of the other air intake tube to put it back on the back of the engine, I would have removed it also. But, cannot get to where you need to to put it back on again so thought better of it. I hope this starter lasts as long as I have use for it. Problem is 90% of my use of the machine is short trips which means lots of starting.
 
Tuesday i wanted to mow to clean up old leaves sticks and old scraggly grass to make it look 1/2 tidy again , 1st mow for the spring got near all of it done cept about 50' down the far end boundary hillside and done broke the cutter belt , took it back up to the shed (work shop) and it then sat till Thursday
mine is a JD Sabre 17.5 , 42 duel cut same gear as the L110

IMG_20191027_120453.jpg recently changed the hood and nudge bar off the L110 > IMG_20191027_120520.jpg

the L110 became a doner real quick for a replacement belt and decided to change the cutter deck as well as the spindle and idler pulley bearing are in good condition

IMG_20191031_135227.jpg < my old cutter deck now to be stored away as parts or rebuild

IMG_20191031_135243.jpg all done and finished , it is running way quieter now and cutting clean and even but i should have considered painting it but ran out of time with trying to strip scrap and other chores , just not enough time

Shane
 
Alright. The next project is done. Greased the JD 140 H3 and changed the oil. I think I counted 13 grease nipples on the tractor. Gave every thing a look over. Fixed up the rear blade. Lifts straighter now, not perfect, but better. I did not put the extra paddles on the thrower yet and may not till next year, but I did put the rubber things on the thrower paddles. I’ll see if it makes any difference. Every thing works. Will have to trim the rubber on the paddles. A bit tight.

Noel
 

Attachments

  • F5FF5003-47EA-430E-9BCA-EFF0D9A0299C.jpeg
    F5FF5003-47EA-430E-9BCA-EFF0D9A0299C.jpeg
    182.7 KB · Views: 8
  • F573EE89-F20D-414F-A7B9-F9A462A4774C.jpeg
    F573EE89-F20D-414F-A7B9-F9A462A4774C.jpeg
    169.8 KB · Views: 8
  • 8B4DB518-D64D-4B09-ABC9-55610AF5E12A.jpeg
    8B4DB518-D64D-4B09-ABC9-55610AF5E12A.jpeg
    169.9 KB · Views: 8
  • D31E5064-0564-474B-BEB0-3EE26AAFF8B4.jpeg
    D31E5064-0564-474B-BEB0-3EE26AAFF8B4.jpeg
    181 KB · Views: 9
  • 68771E00-EC5E-44EC-9D4F-31B10D679958.jpeg
    68771E00-EC5E-44EC-9D4F-31B10D679958.jpeg
    209.8 KB · Views: 9
  • 8C502D17-F26D-47D5-93E2-79C6C09CC5DB.jpeg
    8C502D17-F26D-47D5-93E2-79C6C09CC5DB.jpeg
    169.3 KB · Views: 8
Next project is my YT16H Ford. It broke a piece on the tractor that holds the deck up. Get it fixed and do a little service and it will be ready go next years grass cutting. Pictures are not very good. But believe me, it’s broke. Not sure, but I think the axle has to come out to fix it. The deck follows the axle up and down so it does not scalp the grass. Hehe. Deck is already done and put away.

Noel
 

Attachments

  • A024F0F5-66CE-426B-B8AF-E5BDF947A63C.jpeg
    A024F0F5-66CE-426B-B8AF-E5BDF947A63C.jpeg
    99.3 KB · Views: 10
  • 514885E1-B1F3-4D6F-9041-21E9273A2C82.jpeg
    514885E1-B1F3-4D6F-9041-21E9273A2C82.jpeg
    95.2 KB · Views: 10
  • 4CE67800-DBFB-4662-9D5D-556F440A2691.jpeg
    4CE67800-DBFB-4662-9D5D-556F440A2691.jpeg
    192.2 KB · Views: 10
  • 0529B0A7-EDE3-4274-8DB6-8E1C69D6D0A1.jpeg
    0529B0A7-EDE3-4274-8DB6-8E1C69D6D0A1.jpeg
    183.4 KB · Views: 10
Trying to resurrect this headlight lens. NLA unless I go used off ePay. Spenr $23 on stuff and it seems to be working, A few more days and it should be good. 2500 grit and lens polish This is three cycles.
 

Attachments

  • 1.jpg
    1.jpg
    78.2 KB · Views: 8
  • 2.jpg
    2.jpg
    111.9 KB · Views: 8
  • 3.jpg
    3.jpg
    69.1 KB · Views: 9
  • 4.jpg
    4.jpg
    70.2 KB · Views: 9
Clean up in the garage was the line of work for today.Hand sprayers were all drained, wands removed and sprayers hung up on nail in the rafters. Cleaned the tractor work table off, removed the center planks and got it loaded on the back of the Ranger for the trip to the pol building. Won't be needing it this winter so need to room for the van on that side. Neighbor gave me a bunch of Brome seed bags earlier this year. They make a good storage bag for small outdoor power tools like the leaf blower, hedge clippers, etc. Got them all put up and away. Pails all stacked one inside the other, just general organizing type stuff to make room to get 2 vehicles, a wagon load of corn, a sow blower and my Ranger all in the garage at the same time.
 
I'm still "on call" at work, but still got a little done. After I got home from doing my morning rounds at the plant, it was still nice enough to load the cutting deck from the MF12G and go back to the plant and clean it with the pressure washer. Got it up on one of the work benches after the pictures. Then there was some inside chores to do, and then out to the shop again. I've had a bit of sign work come in so I worked on that while the race is on. Took a break from that to report here.

DAC
 

Attachments

  • DSCN1766.JPG
    DSCN1766.JPG
    216.7 KB · Views: 6
  • DSCN1767.JPG
    DSCN1767.JPG
    192.3 KB · Views: 6
Ranger has the soft sides on it. Close with a zipper, snaps and velcro. After 15 years the velcro does nothing, couple snaps were missing/broken but both zippers worke good. Replaced 3 snaps on the right door, added thee more where the vlecro was to go as that door will probably stay closed the rest of the winter. Passenger can slide across the seat from the drivers side. Put some things away in the basement shop and a fwew other chores. Settled in to watch the Chief's beat the Vikings and later Harvick punched his ticket to Homestead for the championship in 3 weeks. Next week they run in the desert at Pheonix.
 
Got the blower mounted and moved to the garage. Lost the shoulder bolt that holds the pto lever, that’s a McMaster Carr order.


759E30E0-C09F-4B89-9125-54FE1EACE30B.jpeg

I went to a two stage blower two years ago from a large frame. My little two cylinder doesn’t have the oomph for that, so back to the single stage this year.

24DC0AE2-48A6-43BB-8927-3258A12D2DB5.jpeg

I still need to mount the 3 point hitch back on so I can throw on the homemade weight box. The three point has to come off to mount the tiller.

D5B7064F-6CDD-40F4-AEB8-2638A7807EA0.jpeg1289A946-564E-4212-B3F1-AC314AE8A3CB.jpeg

I still need to replace the glow plugs, das ist kaput.


B4E3A147-F00D-41FB-AAEE-638BAA390A07.jpeg
 
New fuel lines on the White 1655 later today. Fired it up to move it yesterday and plastic fuel line union decided to break and spray gas all over. Finishing up moving things around for winter. Getting another ton of wood pellets this morning. Probably a load of dry shelled corn later.
 
A way to lube the non lubeable tie rod ends. I’ve done this to some of my other garden tractors too. You then can lube with what ever you want when your doing your service. Use an 1/8 bit. A little grease on bit while drilling will help keep fillings out.

Noel
 

Attachments

  • image.jpg
    image.jpg
    207.2 KB · Views: 9
  • image.jpg
    image.jpg
    183.6 KB · Views: 10
  • image.jpg
    image.jpg
    170.6 KB · Views: 11
  • 1CD8A8A5-DD81-4A0F-9329-DC6EF85CAF2E.jpeg
    1CD8A8A5-DD81-4A0F-9329-DC6EF85CAF2E.jpeg
    130.4 KB · Views: 10
  • C39DDDF6-691B-4212-9FEF-EB5E69AE624F.jpeg
    C39DDDF6-691B-4212-9FEF-EB5E69AE624F.jpeg
    129.5 KB · Views: 9
  • ABE6238D-9DF8-4157-9FAE-CEABF5523BE6.jpeg
    ABE6238D-9DF8-4157-9FAE-CEABF5523BE6.jpeg
    141.1 KB · Views: 9
  • F4A09836-F529-4C7E-8CA8-B82F73B76FD6.jpeg
    F4A09836-F529-4C7E-8CA8-B82F73B76FD6.jpeg
    127.3 KB · Views: 8
  • 8B13D0B7-F027-4B25-BAB3-956F3C9BE921.jpeg
    8B13D0B7-F027-4B25-BAB3-956F3C9BE921.jpeg
    137.7 KB · Views: 8
  • 433F3CA9-7BE8-42FE-B644-61697243AD16.jpeg
    433F3CA9-7BE8-42FE-B644-61697243AD16.jpeg
    142.7 KB · Views: 8
  • F59FAC7B-8D69-4ACB-B492-0E83919AAE74.jpeg
    F59FAC7B-8D69-4ACB-B492-0E83919AAE74.jpeg
    147.3 KB · Views: 8
Another thing trying to fix today. Leak in line from tank to hydro. All plastic fittings. Fun fun. Good to clean fins out any way.

Noel
 

Attachments

  • EB21B843-853A-4791-A08B-19C7C9E7DD9A.jpeg
    EB21B843-853A-4791-A08B-19C7C9E7DD9A.jpeg
    180.4 KB · Views: 8
  • 58FAECD3-F8A4-42E2-96DB-08D605401BC6.jpeg
    58FAECD3-F8A4-42E2-96DB-08D605401BC6.jpeg
    113.7 KB · Views: 9
  • 1E7418BE-18A5-4DB6-A1A7-91A2468F7B59.jpeg
    1E7418BE-18A5-4DB6-A1A7-91A2468F7B59.jpeg
    199.7 KB · Views: 8
  • 2342CB8A-BAD5-4AE0-9646-95FEA262B039.jpeg
    2342CB8A-BAD5-4AE0-9646-95FEA262B039.jpeg
    221.4 KB · Views: 8
  • B58D75F4-E149-47DA-89C4-0F77B94F3A2F.jpeg
    B58D75F4-E149-47DA-89C4-0F77B94F3A2F.jpeg
    296.2 KB · Views: 9
  • A79A1B83-9C2E-4E36-AC91-871FB4B468EA.jpeg
    A79A1B83-9C2E-4E36-AC91-871FB4B468EA.jpeg
    208.5 KB · Views: 8
  • 00F56081-D506-4BFC-BCE5-7ABD84C49F51.jpeg
    00F56081-D506-4BFC-BCE5-7ABD84C49F51.jpeg
    202.3 KB · Views: 9
  • image.jpg
    image.jpg
    233.7 KB · Views: 8
  • image.jpg
    image.jpg
    188.7 KB · Views: 8
Last edited:
Put a normal steel hose clamp on the hose. Plastic clamps are what’s on it now. So will see if it’s leaking by tomorrow.
Hehe. Didn’t take a picture of the steel hose clamp. But I’m sure you know what I mean. Humor was off a bit at the last of it.

Noel.
 

Attachments

  • 39483DF3-3EE9-4819-94DC-30E54ECFB31A.jpeg
    39483DF3-3EE9-4819-94DC-30E54ECFB31A.jpeg
    419 KB · Views: 6
  • F3D6240A-FDE3-4DA7-9838-A0C87DA9CDF0.jpeg
    F3D6240A-FDE3-4DA7-9838-A0C87DA9CDF0.jpeg
    149.7 KB · Views: 6
Last edited:
Back
Top